우선 필요한 모듈 import와 라이브러리 버전을 맞춰줍니다.
!pip install tensorflow==2.6.0
!pip install keras==2.6.0

import pandas as pd
from tensorflow.keras.preprocessing.text import Tokenizer
from tensorflow.keras.preprocessing.sequence import pad_sequence
from tensorflow.keras.utils import to_categorical
import numpy as np
import re
import matplotlib.pyplot as plt
데이터를 불러오고 한 번 확인해봅니다.
데이터는 https://www.manythings.org/anki/ 여기서 가져왔습니다.
file_path = '.../fra.txt'
lines = pd.read_csv(file_path, name=['eng', 'fra', 'cc'], sep='\t')
print('전체 샘플의 수 : ', len(lines))
lines.sample(5)
cc컬럼의 데이터는 번역에 딱히 영향이 없어 보입니다. cc컬럼을 제외한 나머지만 사용하겠습니다.
# 원본 데이터가 너무 많아서 훈련에는 60000개의 데이터만 사용하겠습니다.
# 3000개는 나중에 테스트 데이터로 사용 하겠습니다.

lines = lines['eng', 'fra'][:63000]
lines.sample(5)
1. 정제, 정규화, 전처리 (영어, 프랑스어 모두)
1. 구두점(Punctuation)을 단어와 분리
구두점이란 '문장의 논리적 관계를 밝혀 정확한 의미를 전달하기 위한 표기상의 부호'라고 정의되어 있습니다. 예를 들면 '.', ',', '!' 등이 있습니다.
2. 문장을 소문자로 변경
문장을 소문자로 변경하는 이유는 영어에서 발생하는 문제가 있기 때문입니다. 영어 단어 First와 first를 우리가 보기엔 똑같은 의미라는 것을 알지만 컴퓨터는 다른 단어로 인식할 수 있기 때문에 전부 소문자로 변경해줍니다.
# 전처리를 위해 각 컬럼들을 넘파이 배열로 가져옵니다.
lines_np_eng = lines['eng'].to_numpy()
lines_np_fra = lines['fra'].to_numpy()

# 문장을 소문자로 변경 후, 특수문자와 문자 사이에 공백을 넣어주는 함수를 정의하겠습니다.

# 시작 토큰과 마무리 토큰을 정의 해줍니다.
# 시작 토큰의 뒤, 마무리 토큰의 앞쪽에 공백이 있음에 주의하세요!
sos_token = '<start> '
eos_token = ' <end>'

def preprocess_line(line, plus_token = True):
  # 소문자로 변경하기
  line = line.lower().strip()
  # 구두점을 단어와 분리하기
  line = re.sub(r"([?.,!¿])", r" \1 ", line)
  line = re.sub(r'[" "]+', " ", line)
  line = re.sub(r"[^a-zA-Z?.!,¿]+", " ", line)

  line = line.strip()

  if plus_token == Ture:
    line = sos_token + line + eos_token

  return line
띄어쓰기 단위로 토큰화 함수를 정의해줍니다.
토큰화란 주어진 코퍼스(corpus)에서 토큰이라 불리는 단위로 나누는 작업을 말합니다. 토큰의 단위는 상황에 따라 다르지만, 보통 의미 단위로 토큰을 정의합니다. 단어 토큰화, 문장 토큰화 등 다양한 방법이 있습니다.
def tokenize(corpus):
  tokenizer = Tokenizer(
        num_words = 9000,
        filters=' ',
        oov_token="<unk>"
  )
  # oov란 out of vocabulary로 단어장에 저장되지 않은 단어를 뜻합니다.

  tokenizer.fit_on_text(corpus)

  tensor = tokenizer.texts_to_sequence(corpus)

  return tensor, tokenizer
함수들을 정의했으니 영어, 프랑스어를 전처리해주겠습니다.
eng_lines = []
fra_lines = []

for eng, fra in zip(lines.eng, lines.fra):
  if len(eng) == 0: continue
  if len(fra) == 0: continue

  eng_lines.append(preprocess_line(eng, plus_token=False))
  fra_lines.append(preprocess_line(fra))

eng_tensor, eng_tokenizer = tokenize(eng_lines)
fra_tensor, fra_tokenizer = tokenize(fra_lines)
fra_tensor[:10]
위의 텐서를 보면 길이가 다른 것을 볼 수 있습니다. 이렇게 길이가 다른 상태로 모델에 입력으로 들어가면 문제가 생기기 때문에 길이를 맞춰주기 위해 나중에 패딩을 추가해주겠습니다.
그전에 먼저 input, target을 설정하겠습니다.
- 인코더에 입력으로 들어가는 데이터는 영어 문장입니다.
- 디코더에 입력으로 들어가는 데이터는 해당하는 프랑스 문장이고, 거기에 시작을 알리는 <start>토큰이 있습니다. <end>토큰은 없습니다.
- 디코더의 target값은 프랑스 문장에 <start>토큰이 없고 <end>토큰이 있어 <end>토큰이 나올 때 모델이 생성을 멈추게 됩니다.
encoder_input = eng_tensor

# 종료 토큰 제거
decoder_input = [[char for char in line if char != fra_tokenizer.word_index['<end>']] for line in fra_tensor]

# 시작 토큰 제거
decoder_output = [[char for char in line if char != fra_tokenizer.word_index['<start>']] for line in fra_tensor]
텐서의 길이를 맞춰주기 위해 패딩을 추가해줍니다.
패딩 추가를 위해 정의한 함수는
- 텐서를 리스트로 받아옵니다.
- 리스트에 있는 각 요소의 길이, 그러니까 각 문장의 토큰의 개수를 구합니다.
- 토큰의 개수 중 가장 큰 수를 구합니다. 이는 모든 문장들 중 토큰이 가장 많은 문장의 토큰 개수가 될 것입니다.
- 토큰이 가장 많은 문장의 토큰 개수를 기준으로 패딩을 추가해줍니다. 만약 최대 토큰 개수가 8개이고 토큰이 두 개밖에 없는( [1, 2] ) 문장이 있었다면, 패딩을 추가해주면 [1,2,0,0,0,0,0,0]처럼 됩니다.
def pad_tensor(tensor):
  total_data_text = list(tensor)
  num_tokens = [len(tokens) for tokens in total_data_text]
  max_tokens = max(num_tokens)
  maxlen = int(max_tokens)
  tensor = pad_sequences(tensor, padding='post', maxlen=maxlen)
  return tensor


encoder_input = pad_tensor(encoder_input)
decoder_input = pad_tensor(decoder_input)
decoder_target = pad_tensor(decoder_target)

print('영어 데이터의 크기(shape) : ', np.shape(encoder_input))
print('프랑스어 입력데이터의 크기(shape) : ', np.shape(decoder_input))
print('프랑스어 출력데이터의 크기(shape) : ', np.shape(decoder_target))
영어, 프랑스어 단어장의 크기를 정해주고 한 번 전반적인 길이를 확인해봅니다.
eng_vocab_size = len(eng_tokenizer.word_index) + 1
fra_vocab_size = len(fra_tokenizer.word_index) + 1

max_eng_seq_len = encoder_input.shape[1]
max_fra_seq_len = decoder_input.shape[1]

print('전체 샘플의 수 :',len(lines))
print('영어 단어장의 크기 :', eng_vocab_size)
print('프랑스어 단어장의 크기 :', fra_vocab_size)
print('영어 시퀀스의 최대 길이', max_eng_seq_len)
print('프랑스어 시퀀스의 최대 길이', max_fra_seq_len)
이제 전처리는 완료했고 모델 훈련을 위해 train, test 셋을 나눠주겠습니다.
처음에 정한 것처럼 훈련 60000개, 테스트 3000개로 나누겠습니다.
indices = np.arange(encoder_input.shape[0])
np.random.shuffle(indices) # 데이터들을 한 번 섞어줍니다.

encoder_input = encoder_input[indices]
decoder_input = decoder_input[indices]
decoder_target = decoder_target[indices]

n_of_val = 3000 # 테스트 셋의 크기

encoder_input_train = encoder_input[:-n_of_val]
decoder_input_train = decoder_input[:-n_of_val]
decoder_target_train = decoder_target[:-n_of_val]

encoder_input_test = encoder_input[-n_of_val:]
decoder_input_test = decoder_input[-n_of_val:]
decoder_target_test = decoder_target[-n_of_val:]

print(encoder_input_train.shape)
print(decoder_input_train.shape)
print(decoder_target_train.shape)
print(encoder_input_test.shape)
print(decoder_input_test.shape)
print(decoder_target_test.shape)
2. 임베딩 층(Embedding Layer) 사용하여 모델 학습
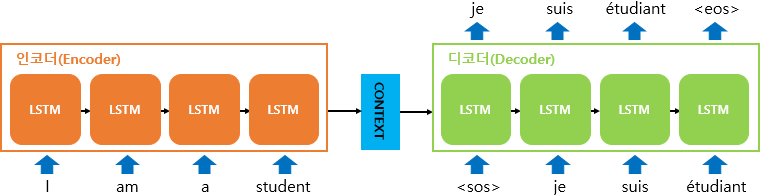
우리가 구현할 모델은 위와 같은 모양입니다. 인코더에서 LSTM 셀을 거쳐 영어 문장에 대한 어떤 정보다 담긴 벡터(hidden state, cell state)를 반환하고, 그 정보와 디코더의 입력으로 정해놓은 데이터를 디코더에 넣어서 학습을 진행하게 됩니다.
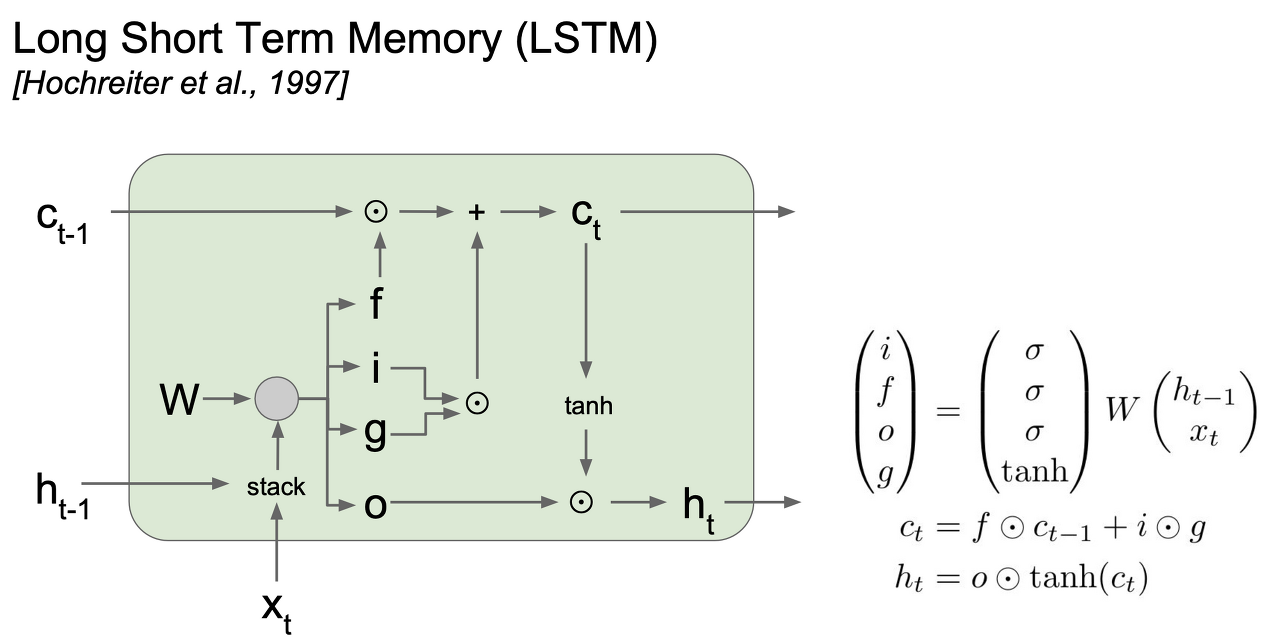
LSTM 셀은 그림과 같이 생겼습니다. 자세한 설명은 하지 않겠지만 중요한 것은 Vanilla RNN과 다르게 cell state와 hidden state 두 가지 정보가 출력으로 나온다는 것을 볼 수 있습니다.
그럼 모델을 설계해보겠습니다.
from tensorflow.keras.layers import Input, Embedding, Masking, LSTM, Dense
from tensorflow.keras.models import Model

embedding_size = 512
hidden_size = 512

encoder_inputs = Input(shape=(None, ), name='encoder_input')
enc_emb = Embedding(eng_vocab_size, embedding_size, input_length=max_eng_seq_len)(encoder_inputs)
enc_masking = Masking(mask_value=0.0)(enc_emb)
encoder_lstm = LSTM(hidden_size, dropout=0.4, return_state=True)
encoder_outputs, state_h, state_c = encoder_lstm(enc_masking)
encoder_states = [state_h, state_c]

decoder_inputs = Input(shape=(None, ), name='decoder_input')
dec_emb = Embedding(fra_vocab_size, embedding_size)(decoder_inputs)
dec_masking = Masking(mask_value=0.0)(dec_emb)
decoder_lstm = LSTM(hidden_size, dropout=0.4, return_sequences=True, return_state=True)
decoder_outputs, _, _ = decoder_lstm(dec_masking, initial_state = encoder_states)
decoder_softmax_layer = Dense(fra_vocab_size, activation='softmax')
decoder_outputs = decoder_softmax_layer(decoder_outputs)

model = Model([encoder_inputs, decoder_inputs], decoder_outputs)
model.compile(optimizer='rmsprop', loss='sparse_categorical_crossentropy')

model.summary()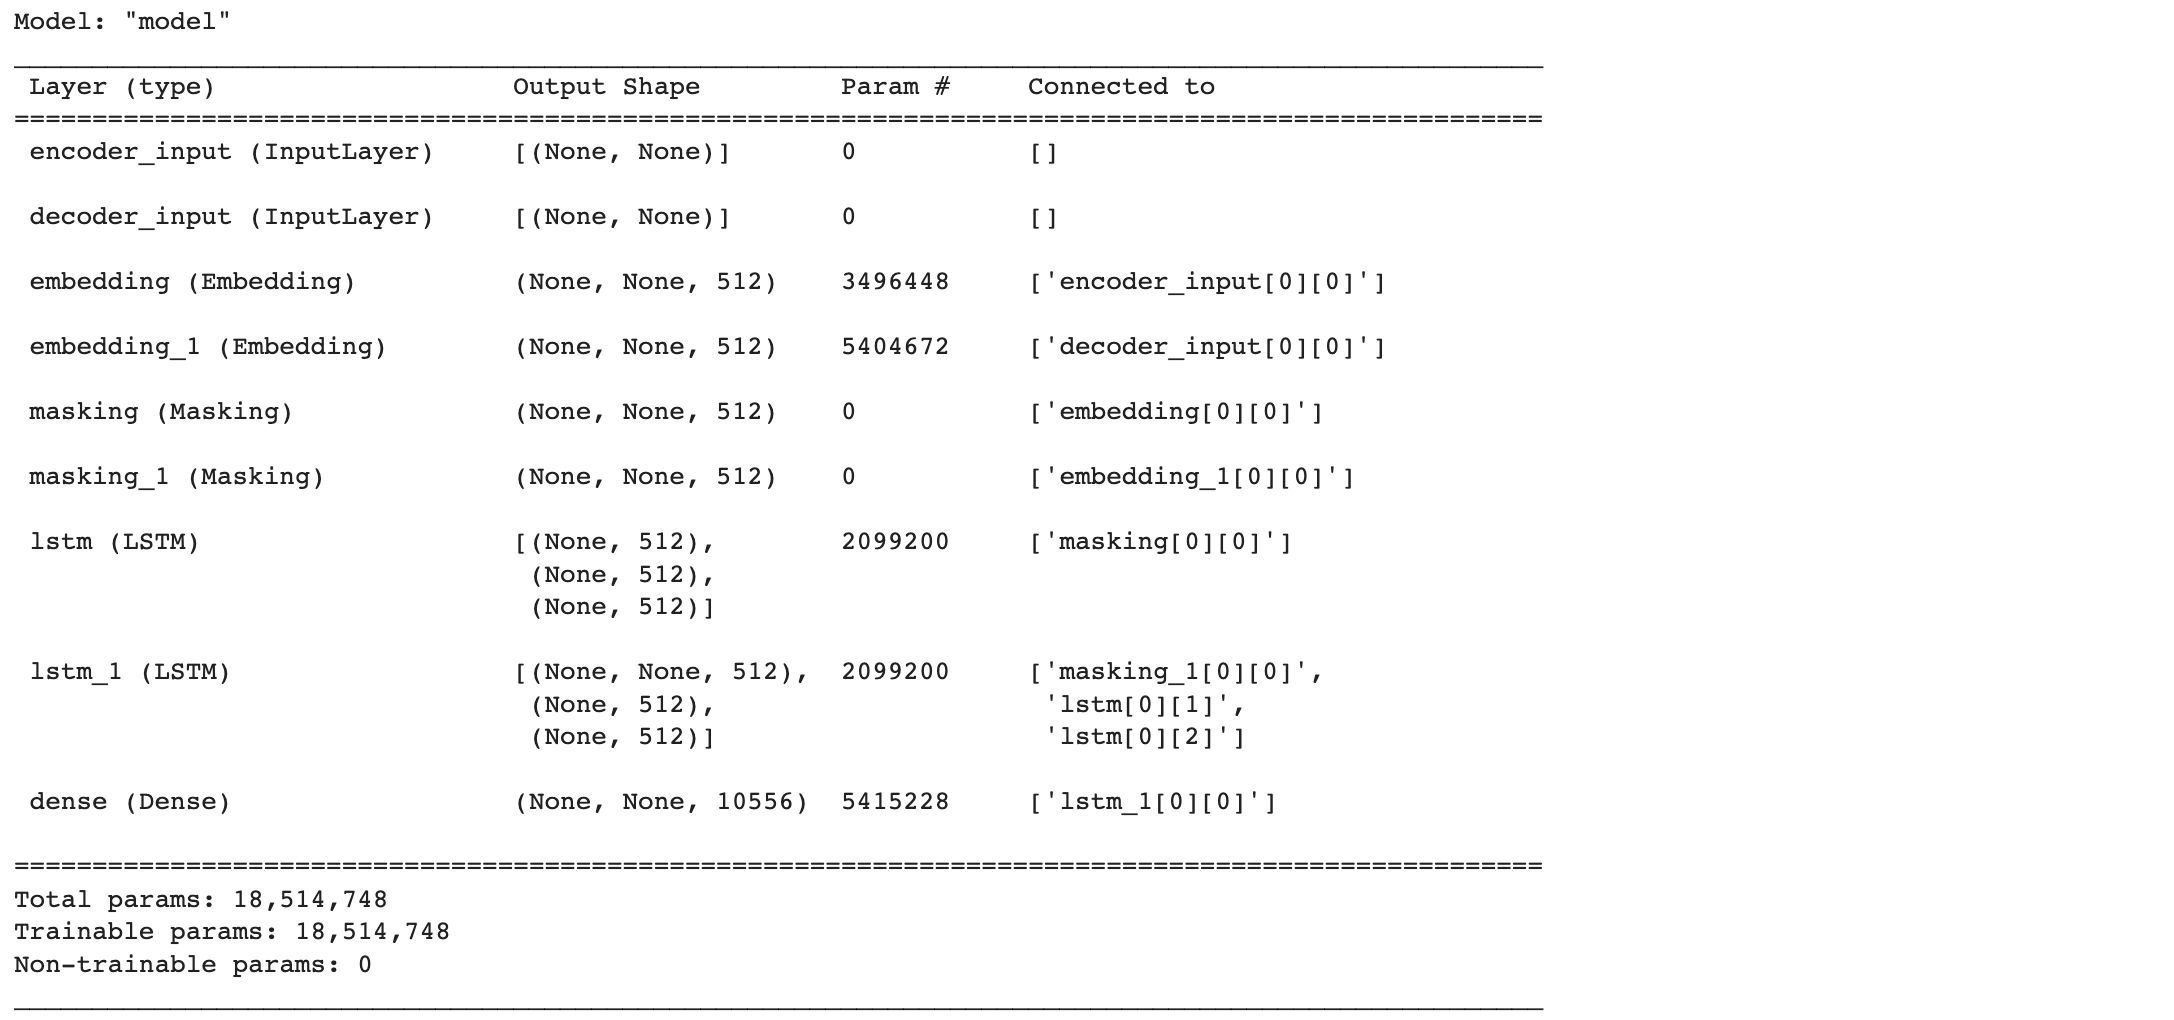
설계 과정에 중간에 dec_mask라는 마스킹 레이어가 들어갔습니다.
마스킹 레이어에서 Masking(mask_value=0.0)으로 지정하면 마스킹 레이어의 인풋으로 들어오는 텐서에서 값이 0.0인 부분이 False로 마스킹됩니다.
예를 들어
[[1, 2, 3, 0.0],
[0.0, 1, 2, 0.0]]
인 데이터가 마스킹 레이어로 들어가게 되면 출력으로 다음과 같은 값이 나옵니다
[[True, True, True, False],
[False, True, True, False]]
이렇게 마스킹된 데이터가 LSTM레이어에서 처리될 때 마스킹된 부분(False)은 계산하지 않고 건너뜁니다.
쉽게 말해 마스킹을 통해 데이터에서 패딩 처리된 부분이 어딘지 알려주고 그 부분은 굳이 계산하지 말고 건너뛰어라고 말해주는 것입니다.
이제 모델 학습을 진행하겠습니다.
학습 과정을 시각화하기 위해 history에 중간 결과를 저장하겠습니다.
history = model.fit(x=[encoder_input_train, decoder_input_train],
                    y = decoder_target_train,
                    validation_data = ([encoder_input_test, decoder_input_test],
                                        decoder_target_test),
                    batch_size=64,
                    epochs=20)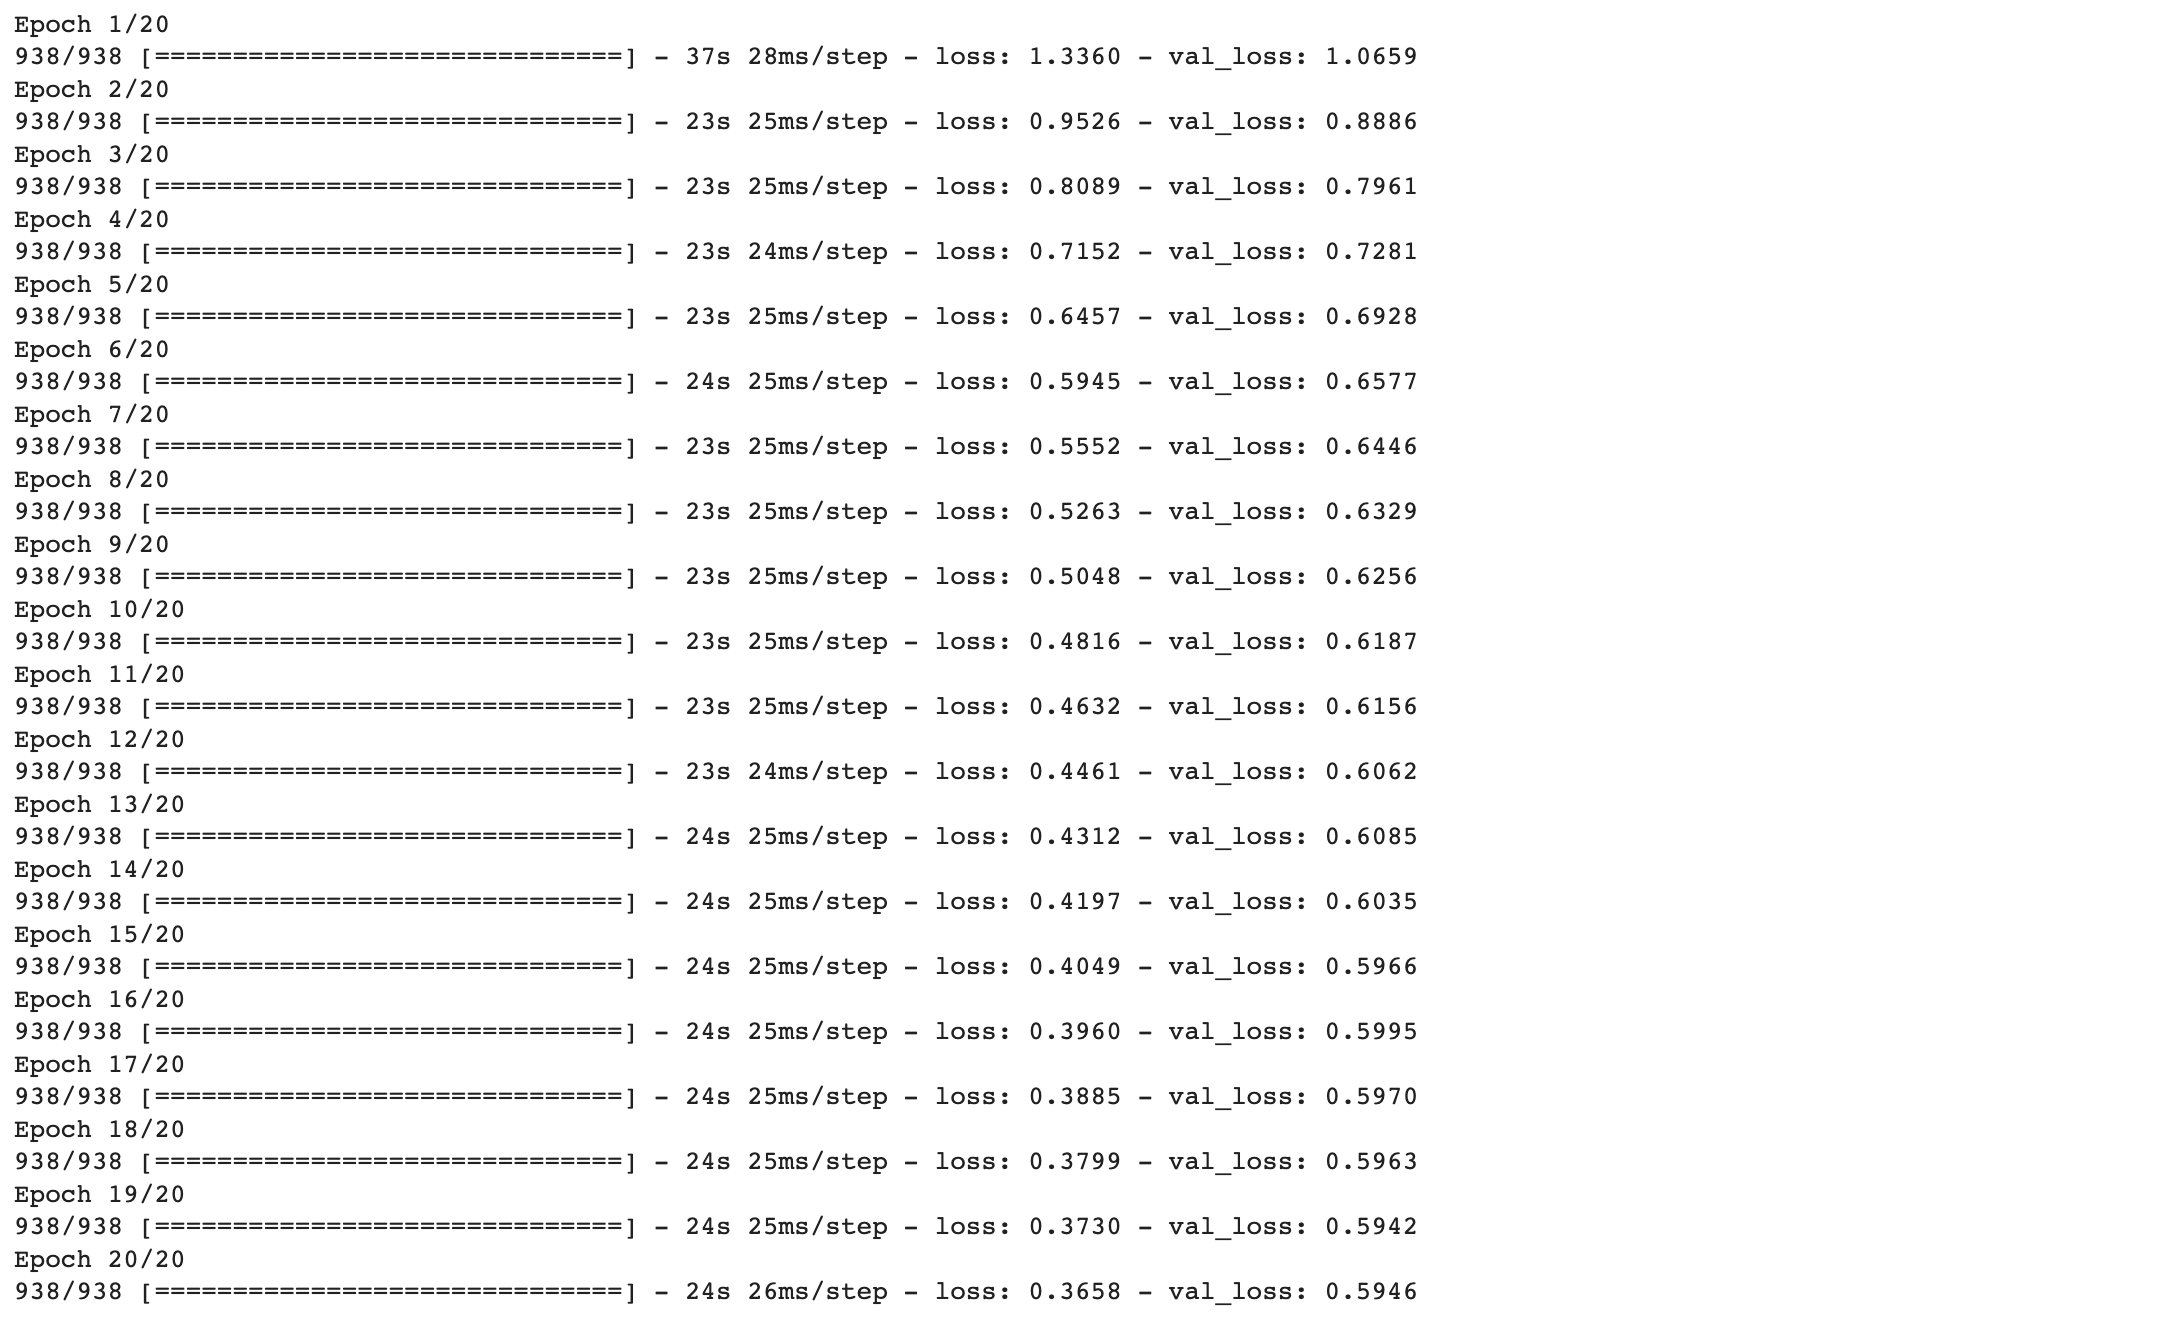
시각화해보겠습니다.
loss = history_dict['loss']
val_loss = history_dict['val_loss']

epochs = range(1, 21)

plt.plot(epochs, loss, 'bo', label='Training loss')
plt.plot(epochs, val_loss, 'b', label='Validation loss')
plt.title('Training and Validation loss')
plt.xlabel('Epochs')
plt.ylabel('Loss')
plt.legend()

plt.show()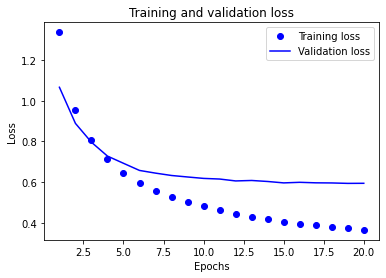
3. 모델 구현하기
인코더
encoder_model = Model(inputs = encoder_inputs, outputs = encoder_states)
encoder_model.summary()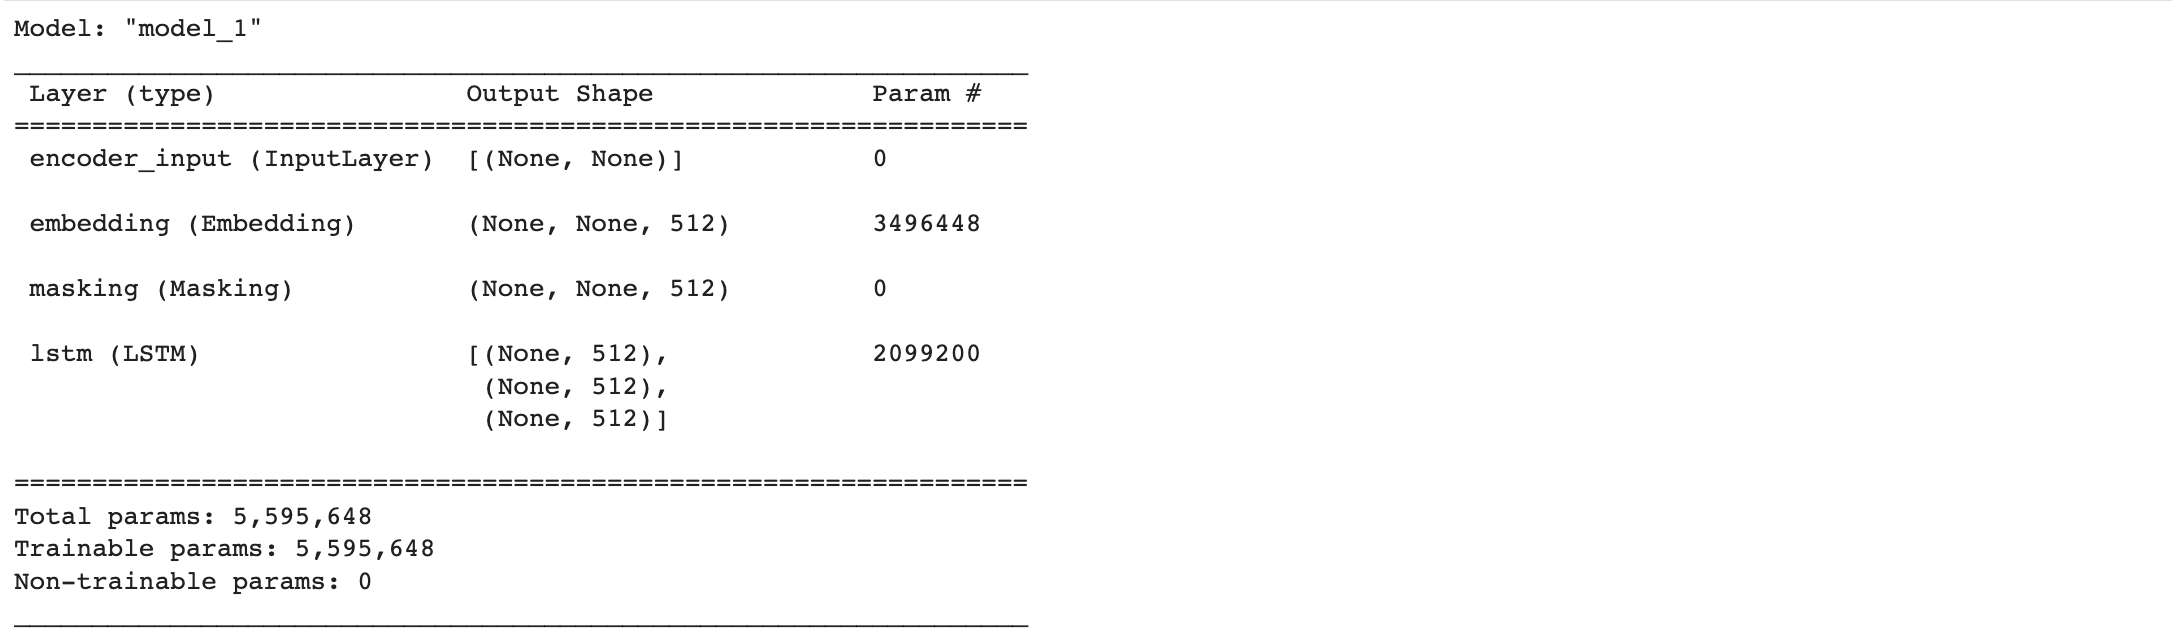
디코더
decoder_state_input_h = Input(shape=(embedding_size,))
decoder_state_input_c = Input(shape=(embedding_size,))
decoder_states_inputs = [decoder_state_input_h, decoder_state_input_c]

dec_emb2 = Embedding(fra_vocab_size, embedding_size)(decoder_inputs)
decoder_outputs2, state_h2, state_c2 = decoder_lstm(dec_emb2, initial_state = decoder_states_inputs)
decoder_states2 = [state_h2, state_c2]

decoder_outputs2 = decoder_softmax_layer(decoder_outputs2)

decoder_model = Model(inputs=[decoder_inputs] + decoder_states_inputs, outputs=[decoder_outputs2] + decoder_states2)
decoder_model.summary()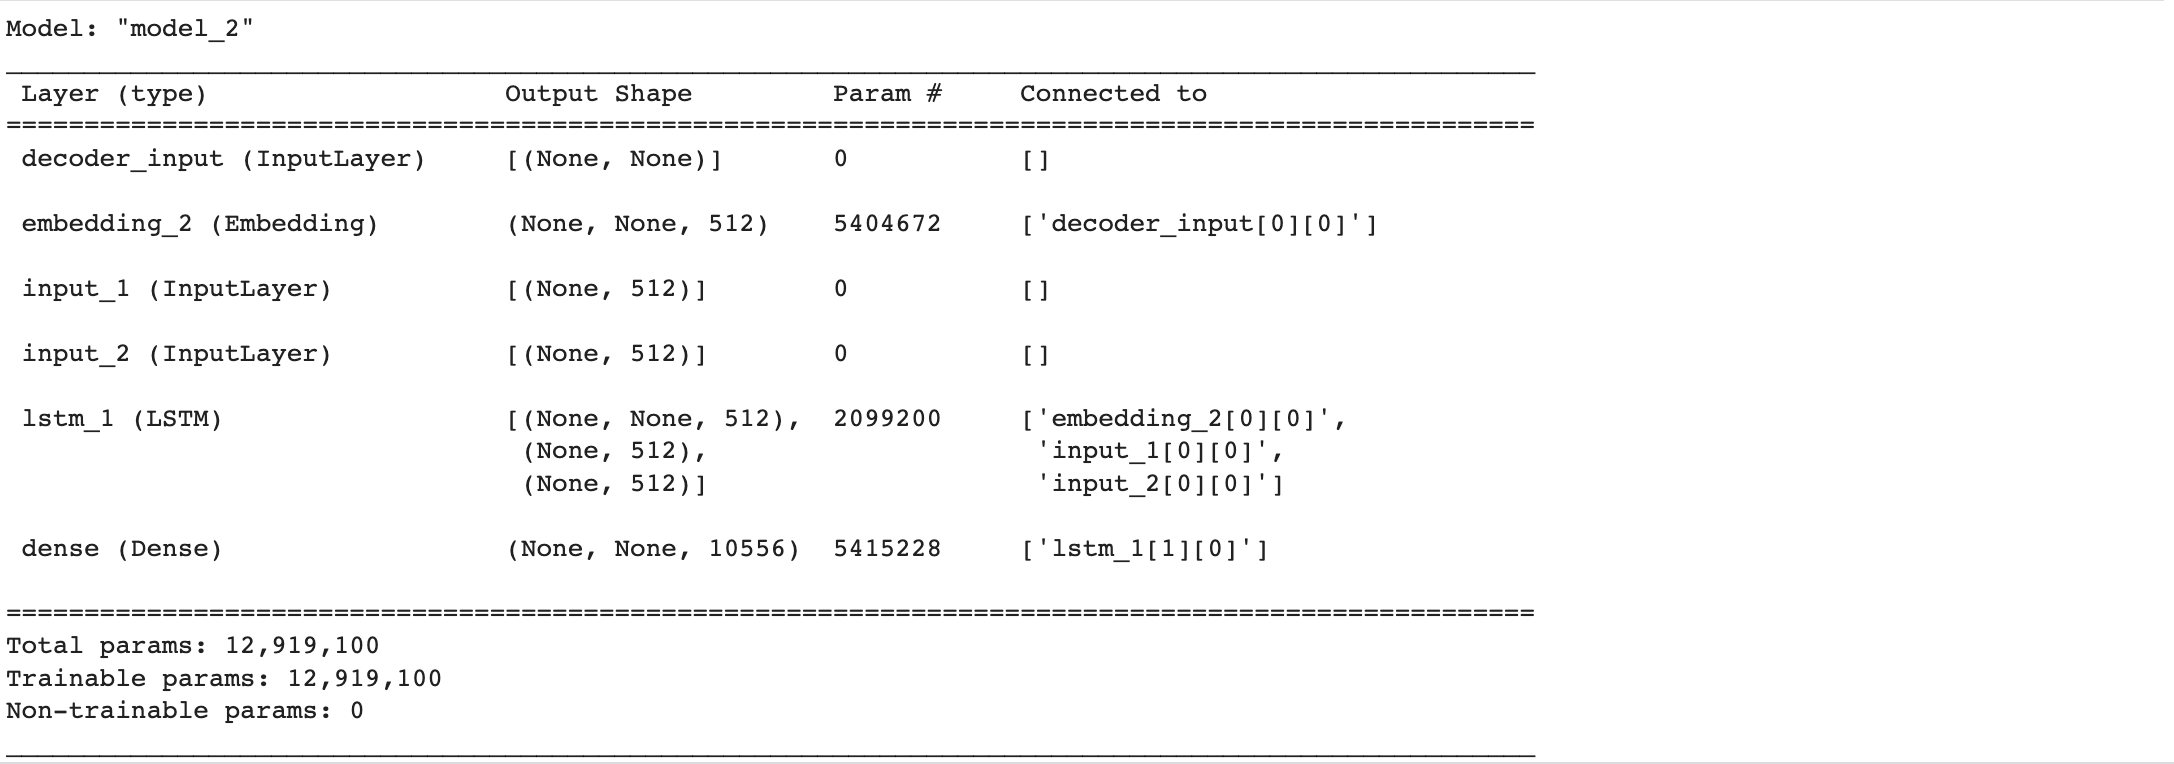
eng2idx = eng_tokenizer.word_index
fra2idx = fra_tokenizer.word_index
idx2eng = eng_tokenizer.index_word
idx2fra = fra_tokenizer.index_word

def decode_sequence(input_seq):
  # 입력으로부터 인코더의 상태를 얻음
  states_value = encoder_model.predict(input_seq)

  # <start>에 해당하는 원-핫 벡터 생성
  target_seq = np.zeros((1,1))
  target_seq[0,0] = fra2idx['<start>']

  stop_condition = False
  decoded_sentence = ""

  # stop_condition이 True가 될 때까지 루프 반복
  while not stop_condition:
    # 이전 시점의 상태 states_value를 현 시점의 초기 상태로 사용
    output_tokens, h, c = decoder_model.predict([target_seq] + states_value)

    # 예측 결과를 문자로 변환
    sampled_token_index = np.argmax(output_tokens[0, -1, :])
    sampled_char = idx2fra[sampled_token_index]

    # 현재 시점의 예측 문자를 예측 문장에 추가
    decoded_sentence += ' '+sampled_char

    # <eos>에 도달하거나 최대 길이를 넘으면 중단.
    if (sampled_char == '<end>' of len(decoded_sentence) > max_fra_seq_len):
      stop_condition = True

    # 현재 시점의 예측 결과를 다음 시점의 입력으로 사용하기 위해 저장
    target_seq = np.zeros((1,1))
    target_seq[0,0] = sampled_token_index

    # 현재 시점의 상태를 다음 시점의 상태로 사용하기 위해 저장
    states_value = [h, c]

  return decoded_sentence
# 원문의 정수 시퀀스를 텍스트 시퀀스로 변환
def seq2src(input_seq):
temp = ''
for i in input_seq:
if (i != 0):
temp = temp + idx2eng[i]+' '
return temp
# 번역문의 정수 시퀀스를 텍스트 시퀀스로 변환
def seq2tar(input_seq):
temp=''
for i in input_seq:
if((i!=0 and i!=fra2idx['<start>'] and i!=fra2idx['<end>']):
temp = temp + idx2fra[i] + ' '
return temp4. 모델 평가하기
for seq_index in [1, 201, 501, 1004, 2015]:
  input_seq = encoder_input_test[seq_index : seq_index + 1]
  decoded_sentence = decode_sequence(input_seq)
  print(35*"-")
  print('입력 문장 : ', seq2src(encoder_input_test[seq_index])
  print('정답 문장:', seq2tar(decoder_input_test[seq_index]))
  print('번역기가 번역한 문장:', decoded_sentence[:len(decoded_sentence)-1])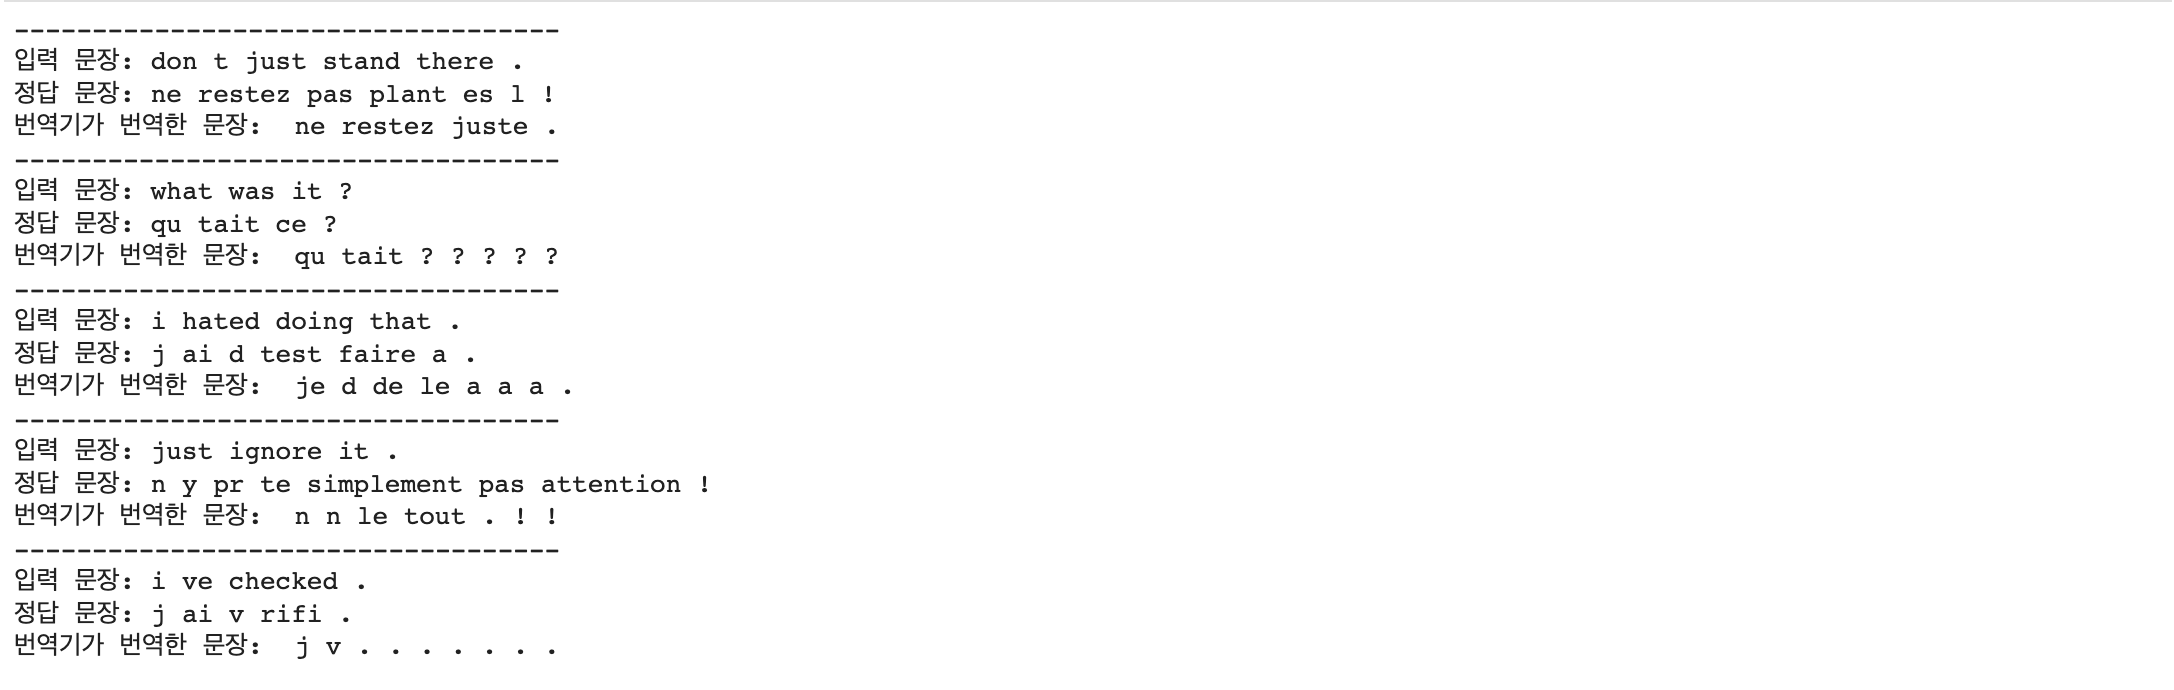
- LSTM
https://real-myeong.tistory.com/6?category=1081327
Lecture 10 : Recurrent Neural Networks
해당 게시물은 Standford 2017 CS231n 강의를 들으며 정리한 내용이며 슬라이드를 바탕으로 작성되었습니다. 이번 강의는 Recurrent Neural Networks에 관한 내용입니다. 위 그림은 RNN을 이용해서 만들 수 있
real-myeong.tistory.com
LSTMs Explained: A Complete, Technically Accurate, Conceptual Guide with Keras
I know, I know — yet another guide on LSTMs / RNNs / Keras / whatever. There are SO many guides out there — half of them full of false…
medium.com
- seq2seq
1) 시퀀스-투-시퀀스(Sequence-to-Sequence, seq2seq)
이번 실습은 케라스 함수형 API에 대한 이해가 필요합니다. 함수형 API(functional API, https://wikidocs.net/38861 )에 대해서 우선 숙 ...
wikidocs.net
- Masking 레이어
https://www.tensorflow.org/guide/keras/masking_and_padding
Masking and padding with Keras | TensorFlow Core
Masking and padding with Keras 컬렉션을 사용해 정리하기 내 환경설정을 기준으로 콘텐츠를 저장하고 분류하세요. 설정 import numpy as np import tensorflow as tf from tensorflow import keras from tensorflow.keras import layer
www.tensorflow.org
'AI > Toy Project' 카테고리의 다른 글
| [NLP] Attention을 이용하여 한-영 번역기 만들기 (0) | 2022.10.17 |
|---|---|
| 뉴스 요약봇 만들기 (1) | 2022.09.22 |
| 네이버 영화리뷰 감성분석하기 (1) | 2022.09.21 |


