안녕하세요
이번엔 긴 문장을 요약해주는 텍스트 요약기를 만들어보겠습니다.
텍스트 요약이란 긴 길이의 문서(Document)원문을 핵심 주제만으로 구성된 짧은 요약(Summary) 문장들로 변환하는 것을 말합니다. 예를 들어 뉴스 기사로 뉴스의 헤드라인을 만들어내는 것이 있습니다.
요약할 때 중요한 것은 요약 전후의 정보 손실이 최소화되어야 한다는 점입니다. 이것은 원문의 길이가 길수록 만만치 않은 어려운 작업이 됩니다. 우리가 요약을 한다라고 하면 긴 문장을 정확하게 읽고 이해한 후, 그 의미를 손상하지 않는 짧은 다른 표현으로 원문을 번역해야 하는 것입니다.
그렇게 요약 문장을 만들어내는 방법은 크게 두 가지가 있습니다. 바로 추출적 요약(Extractive Summarization)와 추상적 요약(Abstractive Summarization)입니다.
- 추출적 요약(Extractive Summarization) : 추출적 요약은 말 그대로 원문에서 문장을 추출해서 요약하는 방식입니다. 다시 말해 핵심 문장을 꺼내와서 요약문을 만드는 형식입니다. 그런데 이렇게 되면 뽑아온 문장이 중요한 내용일 수는 있지만 문장의 연결이 자연스럽지 않을 수 있습니다.
- 추상적 요약(Abstractive Summarization) : 추상적 요약은 추출적 요약과 다르게 원문으로부터 내용이 요약된 새로운 문장을 생성해내는 것입니다. 여기서 새로운 문장이라는 것은 요약된 문장이 원문에 없던 문장일 수 있다는 말입니다. 이는 자연어 처리 분야 중 자연어 생성(Natural Language Generation, NLG)의 영역인 셈입니다.
이번에 만들어 볼 뉴스 요약봇은 기본적으로 seq2seq 구조로 설계되어 있습니다. 하지만 번역기에서 사용한 seq2seq를 그대로 사용하는 것이 아니라 여기에 어텐션 메커니즘(Attention Mechanism)을 추가할 것입니다.
어텐션이란 디코더에서 출력 단어를 예측하는 타임 스텝마다, 인코더에서의 전체 입력 문장을 다시 한 번 참고하는 아이디어로 만들어진 것입니다. 하지만, 전체 문장을 전부 동일한 비율로 참고하는 것이 아니라, 해당 시점에서 예측해야 할 단어와 연관이 있는 입력 단어 부분을 좀 더 집중해서 보게 됩니다.
어텐션에는 다양한 종류가 있지만 그 중에서 닷-프로덕트 어텐션(Dot-Product Attention)을 통해 어텐션에 대해 알아보겠습니다.

위 그림은 디코더의 세번째 LSTM 셀에서 출력 단어를 예측할 때, 어텐션 메커니즘을 사용하는 모습을 보여줍니다. 앞서 말한 것처럼 디코더에서 세 번째 LSTM셀은 출력 단어를 예측하기 위해 인코더의 모든 입력 단어들의 정보를 다시 한번 참고합니다.
위 그림에서 인코더의 각 셀에서의 hidden state를 각각 $h1, h2, h3, h4$라고 하겠습니다. 어텐션 메커니즘에서는 이 $h1, h2, h3, h4$를 가중합(Weighted Sum)하여 컨텍스트 벡터(Context vector)를 만들어줍니다. 컨텍스트 벡터라고 부르는 이유는 인코더의 문맥을 포함하고 있다고 하여 이렇게 부릅니다.
예를 들어 컨텍스트 벡터를 $a_t$라 한다면 컨텍스트 벡터는 아래 값과 같이 될 수 있습니다.
$$a_t = 0.2 \times h_1 + 0.3 \times h_2 + 0.1 \times h_3 + 0.4 \times h_4$$
이 식에서 눈여겨 볼 것은 단순히 인코더의 내용을 참고하는 것이 아니라 적절한 가중합을 이용해 각 hidden state가 얼마나 영향을 끼치는지 고려한다는 것입니다.
이렇게 만들어진 $a_t$와 디코더에서 현재 타임 스텝의 hidden state를 stack 해줍니다. 두 개를 stack 한 벡터를 $v_t$라 하면 $v_t$를 출력층의 입력으로 넣어주고 출력을 하게 됩니다.
간략하게 작성했지만 좀 더 자세한 내용은 아래 참고 사이트에 링크를 달아놓겠습니다.
그럼 이제 위 내용을 바탕으로 뉴스 요약봇을 만들어 보겠습니다.
필요한 라이브러리를 불러오고, 데이터를 가져오겠습니다.
import nltk
nltk.download('stopwords')

import numpy as np
import pandas as pd
import os
import re
import matplotlib.pyplot as plt
from nltk.corpus imoprt stopwords
from bs4 import BeautifulSoup
from tensorflow.keras.preprocessing.text import Tokenizer
from tensorflow.keras.preprocessing.sequence import pad_sequences
import urllib.request
import warnings
warnings.filterwarnings('ignore', category=UserWarning, module='bs4')


import urllib.request
urllib.request.urlretrieve("https://raw.githubusercontent.com/sunnysai12345/News_Summary/master/news_summary_more.csv", filename="news_summary_more.csv")
data = pd.read_csv('news_summary_more.csv', encoding='iso-8859-1')

data.sample(10)
데이터가 headlines, text 두 개의 컬럼으로 구성되어 있습니다.
추상적 요약 모델 학습에는 healines를 미리 요약되어 있는 문장으로 간주해도 될 것 같습니다.
데이터 전처리
먼저 중복치를 확인하고 만약 있다면 제거해주겠습니다.
headline의 내용은 요약된 내용이라 중복이 될 수도 있지만 text자체가 중복이 되면 안 되기 때문에 text칼럼의 내용 중에서만 중복치 들을 지워주겠습니다.
# 중복치 확인
print('전체 headline 데이터', len(data['headlines']))
print('유니크한 headline 데이터: ', (data['headlines'].nunique()))
print('전체 text 데이터', len(data['text']))
print('유니크한 text데이터', data['text'].nunique())
data.drop_duplicates(subset=['text'], inplace=True)이번에는 결측치가 있는지 확인하고 만약 있다면 삭제해주겠습니다.
data.isnull().sum()
텍스트 정규화와 불용어를 제거해주겠습니다.
텍스트 정규화와 불용어에 사용할 사전을 준비해줍니다.
불용어 사전은 NLTK에서 제공하는 불용어 리스트를 이용하겠습니다.
# 정규화 사전
contractions = {"ain't": "is not", "aren't": "are not","can't": "cannot", "'cause": "because", "could've": "could have", "couldn't": "could not",
                           "didn't": "did not",  "doesn't": "does not", "don't": "do not", "hadn't": "had not", "hasn't": "has not", "haven't": "have not",
                           "he'd": "he would","he'll": "he will", "he's": "he is", "how'd": "how did", "how'd'y": "how do you", "how'll": "how will", "how's": "how is",
                           "I'd": "I would", "I'd've": "I would have", "I'll": "I will", "I'll've": "I will have","I'm": "I am", "I've": "I have", "i'd": "i would",
                           "i'd've": "i would have", "i'll": "i will",  "i'll've": "i will have","i'm": "i am", "i've": "i have", "isn't": "is not", "it'd": "it would",
                           "it'd've": "it would have", "it'll": "it will", "it'll've": "it will have","it's": "it is", "let's": "let us", "ma'am": "madam",
                           "mayn't": "may not", "might've": "might have","mightn't": "might not","mightn't've": "might not have", "must've": "must have",
                           "mustn't": "must not", "mustn't've": "must not have", "needn't": "need not", "needn't've": "need not have","o'clock": "of the clock",
                           "oughtn't": "ought not", "oughtn't've": "ought not have", "shan't": "shall not", "sha'n't": "shall not", "shan't've": "shall not have",
                           "she'd": "she would", "she'd've": "she would have", "she'll": "she will", "she'll've": "she will have", "she's": "she is",
                           "should've": "should have", "shouldn't": "should not", "shouldn't've": "should not have", "so've": "so have","so's": "so as",
                           "this's": "this is","that'd": "that would", "that'd've": "that would have", "that's": "that is", "there'd": "there would",
                           "there'd've": "there would have", "there's": "there is", "here's": "here is","they'd": "they would", "they'd've": "they would have",
                           "they'll": "they will", "they'll've": "they will have", "they're": "they are", "they've": "they have", "to've": "to have",
                           "wasn't": "was not", "we'd": "we would", "we'd've": "we would have", "we'll": "we will", "we'll've": "we will have", "we're": "we are",
                           "we've": "we have", "weren't": "were not", "what'll": "what will", "what'll've": "what will have", "what're": "what are",
                           "what's": "what is", "what've": "what have", "when's": "when is", "when've": "when have", "where'd": "where did", "where's": "where is",
                           "where've": "where have", "who'll": "who will", "who'll've": "who will have", "who's": "who is", "who've": "who have",
                           "why's": "why is", "why've": "why have", "will've": "will have", "won't": "will not", "won't've": "will not have",
                           "would've": "would have", "wouldn't": "would not", "wouldn't've": "would not have", "y'all": "you all",
                           "y'all'd": "you all would","y'all'd've": "you all would have","y'all're": "you all are","y'all've": "you all have",
                           "you'd": "you would", "you'd've": "you would have", "you'll": "you will", "you'll've": "you will have",
                           "you're": "you are", "you've": "you have"}
# 불용어 리스트 확인
print('불용어 개수 : ', len(stopwords.words('english')))
print(stopwords.words('english'))
정규화 사전과 불용어 리스트가 어떻게 구성되었는지 간단하게 살펴봤으니 이번에는 전처리 함수를 정의해주겠습니다.
그리고 정의한 함수를 간단한 샘플 문장에 적용시켜서 전처리가 잘 되는지 살펴보겠습니다.
from collections import Counter
def preprocess_sentence(sentence, remove_stopwords=True):
  sentence = sentence.lower()
  sentence = BeautifulSoup(sentence, 'lxml').text # remove html tag
  sentence = re.sub(r'\([^)]*\)', '', sentence) # 괄호로 닫힌 문자열 제거
  sentence = re.sub('"', '', sentence)
  sentence = ' '.join([contractions[t] if t in contractions else t for t in sentence.split(" ")])
  sentence = re.sub(r"'s\b", "", sentence)
  sentence = re.sub("[^a-zA-Z0-9]", " ", sentence)

  # 단어 내에 같은 문자들이 3개 이상 연속해서 반복되면 삭제하고 최대 2개까지만 반복되도록 만들어줌 (ex. iiit -> iit)
  b = []
  for i in sentence.split():
    a = list(i)
    char_cnt = 0
    for j in a:
      if a.count(j) >= 3:
        a.remove(j)
    word_a = ''.join(a)
    b.append(word_a)
  sentence = ' '.join(b)


  # 불용어 제거
  if remove_stopwords:
    tokens = ' '.join(word for word in sentence.split() if not word in stopwords.words('english') if len(word) > 1)

  # 불용어 미제거
  else:
    tokens = ' '.join(word for word in sentence.split() if len(word) > 1)
  return tokens
# 샘플 문장을 확인
temp_text = 'Everything I bought was great, infact I ordered iiiiit twice and the third ordered 123 was<br />for my mother and father. '
temp_summary = 'Great way to start (or finish) the day!!!'
print("text: ", preprocess_sentence(temp_text))
print("summary:", preprocess_sentence(temp_summary, False)) # 불용어를 제거하지 않습니다.
샘플 문장을 보면 원하는대로 전처리가 진행되는 것을 볼 수 있습니다. 그럼 이제 데이터의 문장들을 전부 전처리해주겠습니다.
# data['text'] 부분 전처리 진행

clean_text = []
for s in data['text']:
  clean_text.append(preprocess_sentence(s))

print('Text 전처리 후 결과 : ', clean_text[:5])
# headline 부분 전처리 진행
clean_headlines = []
for s in data['headlines']:
  clean_headlines.append(preprocess_sentence(s, False))

print('Headlines 전처리 후 결과 : ', clean_headlines[:5])
전처리를 진행하면서 혹시나 결측치가 생겼는지 확인해줍니다.
data['text'] = clean_text
data['headlines'] = clean_headlines

data.replace('', np.nan, inplace=True)

data.isnull().sum()
추가적인 결측치는 생기지 않은 것을 볼 수 있습니다.
이제 훈련을 위해 train, test 데이터를 나눠주겠습니다.
먼저 text, headlines 데이터들의 길이 분포를 시각화해보겠습니다.
import matplotlib.pyplot as plt
text_len = [len(x.split()) for x in data['text']]
headlines_len = [len(x.split()) for x in data['headlines']]
print('텍스트 길이 최대: ', np.max(text_len))
print('텍스트 길이 최소: ', np.min(text_len))
print('텍스트 길이 평균: ', np.mean(text_len))
print('헤드라인 길이 최대: ', np.max(headlines_len))
print('헤드라인 길이 최소: ', np.min(headlines_len))
print('헤드라인 길이 평균: ', np.mean(headlines_len))
plt.subplot(1,2,1)
plt.boxplot(text_len)
plt.title('Text')
plt.subplot(1,2,2)
plt.boxplot(headlines_len)
plt.title('Headlines')
plt.tight_layout()
plt.show()
plt.title('Text')
plt.hist(text_len, bins = 40)
plt.xlabel('length of samples')
plt.ylabel('number of samples')
plt.show()
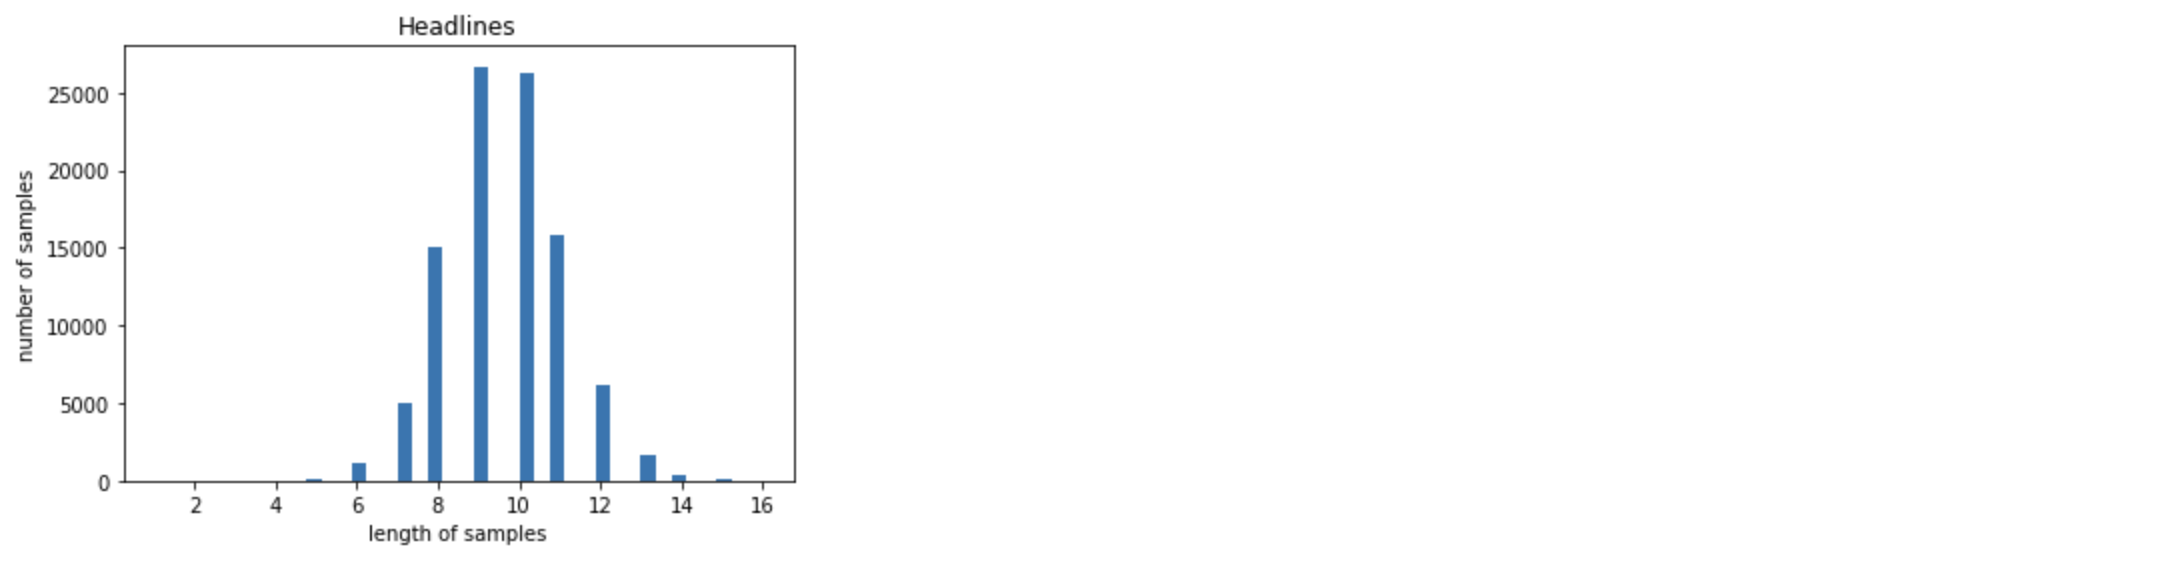
plt.title('Headlines')
plt.hist(headlines_len, bins = 40)
plt.xlabel('length of samples')
plt.ylabel('number of samples')
plt.show()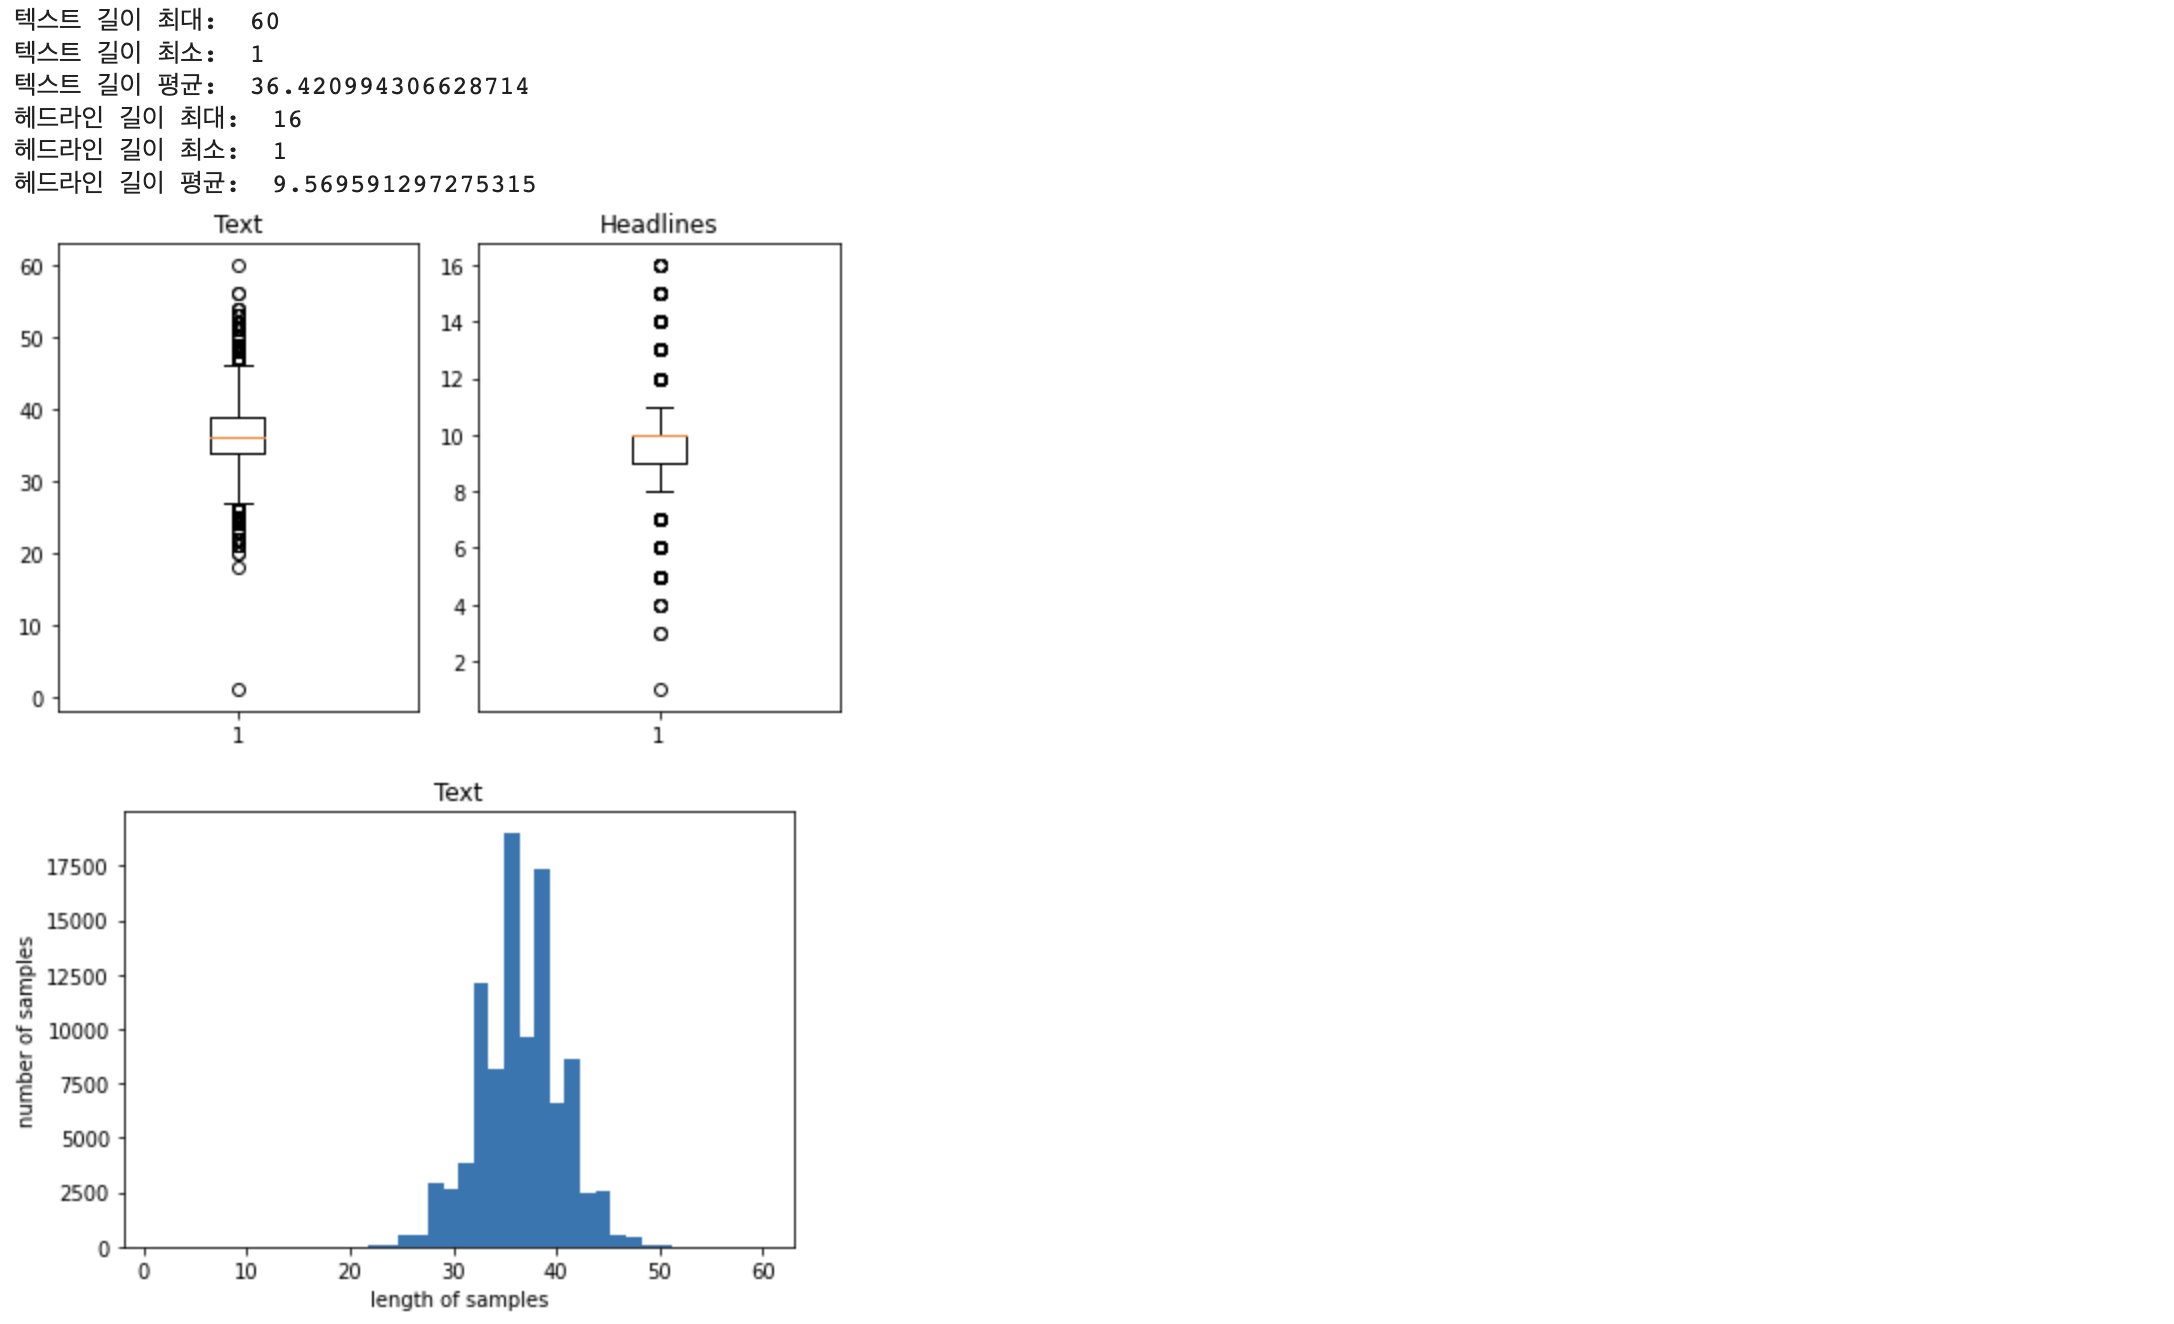
text, headlines의 최대길이를 설정해줘야 하는데, 저는 모든 데이터를 사용하기 위해 제일 긴 길이로 설정해주겠습니다.
만약 최대 길이를 다르게 설정하고 싶다면 최대 길이에 따른 데이터의 비율을 보고 적절한 값을 정할 수 있을 것입니다.
# 텍스트, 헤드라인 최대 길이 설정
max_text_len = 60
max_headline_len = 16

# 최대 길이를 기준으로 나눴을때 최대 길이보다 짧은 데이터의 비율을 출력해주는 함수 정의
def below_threshold_len(max_len, list):
  count = 0
  for s in list:
    if len(s.split()) <= max_len:
      count += 1

  print(f'길이가 {max_len}보다 짧은 데이터의 비율 : {count/len(list)}')


# 비율 확인
below_threshold_len(max_text_len, data['text'])
below_threshold_len(max_headline_len, data['headlines'])
디코더의 학습에 사용될 데이터를 만들어줍니다.
시작 토큰과 마무리 토큰을 사용하여 디코더가 시작과 끝을 알 수 있게 해 줍니다.
data['decoder_input'] = data['headlines'].apply(lambda x : 'starttoken ' + x)
data['decoder_output'] = data['headlines'].apply(lambda x : x + ' endtoken')

data.head()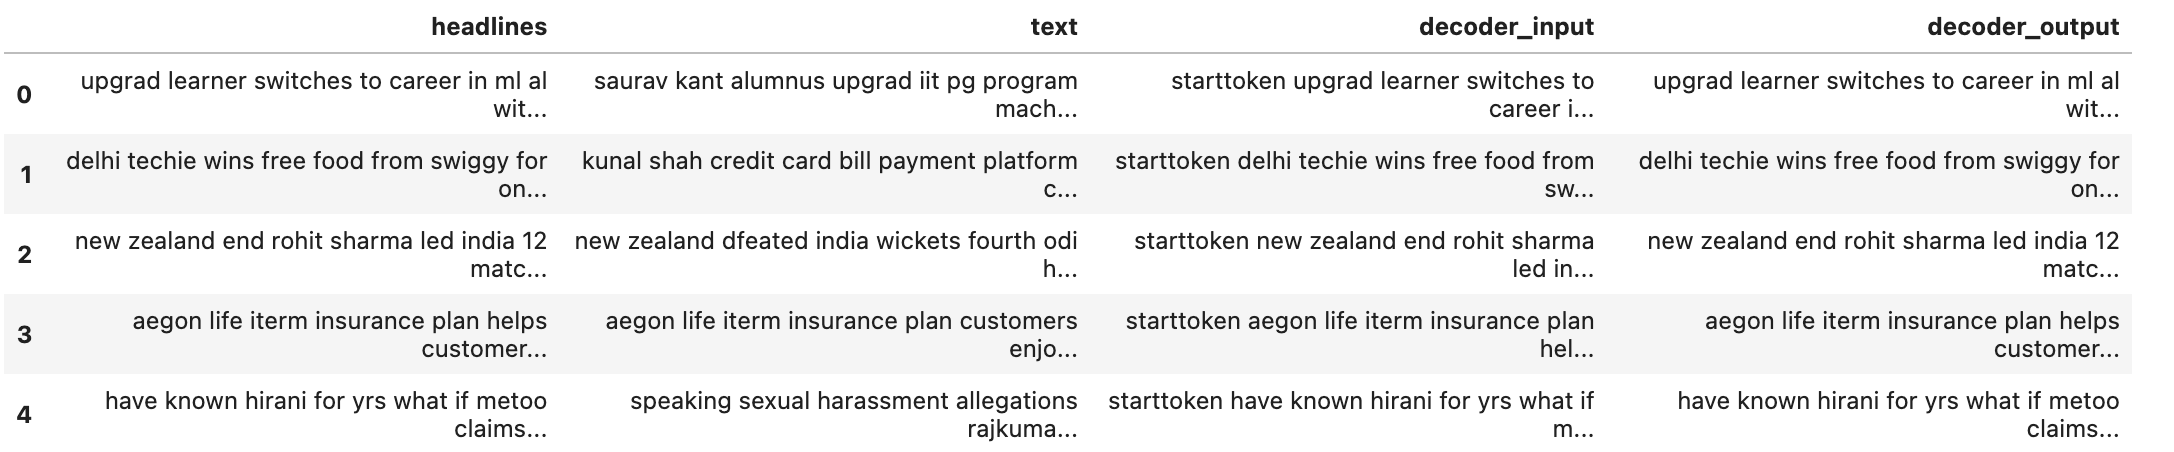
데이터 전처리, 시작 토큰과 마무리 토큰 추가를 해줬으니 이제 훈련 데이터와 테스트 데이터로 나눠주겠습니다.
먼저 데이터들을 Numpy 타입으로 바꿔주고 한 번 잘 섞어줍니다.
encoder_input = np.array(data['text'])

decoder_input = np.array(data['decoder_input'])
decoder_output = np.array(data['decoder_output'])

# 데이터 섞어주기
indices = np.arange(encoder_input.shape[0])
np.random.shuffle(indices)

encoder_input = encoder_input[indices]
decoder_input = decoder_input[indices]
decoder_output = decoder_output[indices]

# 샘플 추출
encoder_input[:5]
테스트 사이즈는 전체 데이터에서 20%로 하겠습니다.
이제 진짜로 훈련 데이터, 테스트 데이터를 나눠줍니다.
val_size = int(encoder_input.shape[0] * 0.2)

encoder_input_train = encoder_input[:-val_size]
decoder_input_train = decoder_input[:-val_size]
decoder_output_train = decoder_output[:-val_size]

encoder_input_test = encoder_input[-val_size:]
decoder_input_test = decoder_input[-val_size:]
decoder_output_test = decoder_output[-val_size:]

print('훈련 데이터의 개수 :', len(encoder_input_train))
print('훈련 레이블의 개수 :', len(decoder_input_train))
print('테스트 데이터의 개수 :', len(encoder_input_test))
print('테스트 레이블의 개수 :', len(decoder_input_test))
지금 데이터가 문장들이기 때문에 모델 학습을 위해 토큰화와 정수 인코딩 과정을 거쳐주겠습니다.
여기서 모든 토큰을 사용하지 않고, 인코더의 인풋으로 들어가는 데이터에서 토큰의 빈도수에 따라 너무 적게 등장하는 토큰은 사용하지 않겠습니다.
# 토크나이저 설정
src_tokenizer = Tokenizer()
src_tokenizer.fit_on_texts(encoder_input_train)

# 단어 빈도수 체크
threshold = 4
total_cnt = len(src_tokenizer.word_index)
rare_cnt = 0
total_freq = 0
rare_freq = 0

for key, value in src_tokenizer.word_counts.items():
  total_freq = total_freq + value

  if value < threshold:
    rare_cnt += 1
    rare_freq = rare_freq + value


print('단어 집합(vocabulary)의 크기 :', total_cnt)
print('등장 빈도가 %s번 이하인 희귀 단어의 수: %s'%(threshold - 1, rare_cnt))
print('단어 집합에서 희귀 단어를 제외시킬 경우의 단어 집합의 크기 %s'%(total_cnt - rare_cnt))
print("단어 집합에서 희귀 단어의 비율:", (rare_cnt / total_cnt)*100)
print("전체 등장 빈도에서 희귀 단어 등장 빈도 비율:", (rare_freq / total_freq)*100)
희귀 단어의 등장 빈도가 전체에서 2% 정도밖에 되지 않지만 단어 집합에서 차지하는 비율이 57%나 됩니다.
이 말은 단어 집합에 있는 절반 이상이 전체 문장에서 단 2%밖에 등장하지 않는다는 말이므로 훈련 데이터에서 빼주겠습니다.
그렇게 되면 우리가 사용할 단어장의 크기는 30847이 됩니다.
한 번 단어장을 만들고 정수 인코딩을 진행해보겠습니다.
src_vocab = 30847
src_tokenizer = Tokenizer(num_words = src_vocab)
src_tokenizer.fit_on_texts(encoder_input_train)

# 정수 인코딩
# 텍스트 시퀀스를 정수 시퀀스로 변환
encoder_input_train = src_tokenizer.texts_to_sequences(encoder_input_train)
encoder_input_test = src_tokenizer.texts_to_sequences(encoder_input_test)

# 샘플 출력하여 확인
print(encoder_input_train[:3])
headline에 대해서도 똑같이 진행해줍니다.
tar_tokenizer = Tokenizer()
tar_tokenizer.fit_on_texts(decoder_input_train)


threshold = 4
total_cnt = len(tar_tokenizer.word_index) # 단어의 수
rare_cnt = 0 # 등장 빈도수가 threshold보다 작은 단어의 개수를 카운트
total_freq = 0 # 훈련 데이터의 전체 단어 빈도수 총 합
rare_freq = 0 # 등장 빈도수가 threshold보다 작은 단어의 등장 빈도수의 총 합

# 단어와 빈도수의 쌍(pair)을 key와 value로 받는다.
for key, value in tar_tokenizer.word_counts.items():
    total_freq = total_freq + value

    # 단어의 등장 빈도수가 threshold보다 작으면
    if(value < threshold):
        rare_cnt = rare_cnt + 1
        rare_freq = rare_freq + value

print('단어 집합(vocabulary)의 크기 :', total_cnt)
print('등장 빈도가 %s번 이하인 희귀 단어의 수: %s'%(threshold - 1, rare_cnt))
print('단어 집합에서 희귀 단어를 제외시킬 경우의 단어 집합의 크기 %s'%(total_cnt - rare_cnt))
print("단어 집합에서 희귀 단어의 비율:", (rare_cnt / total_cnt)*100)
print("전체 등장 빈도에서 희귀 단어 등장 빈도 비율:", (rare_freq / total_freq)*100)
tar_vocab = 13676
tar_tokenizer = Tokenizer(num_words=tar_vocab)
tar_tokenizer.fit_on_texts(decoder_input_train)
tar_tokenizer.fit_on_texts(decoder_output_train)

# 텍스트 시퀀스를 정수 시퀀스로 변환
decoder_input_train = tar_tokenizer.texts_to_sequences(decoder_input_train)
decoder_target_train = tar_tokenizer.texts_to_sequences(decoder_output_train)
decoder_input_test = tar_tokenizer.texts_to_sequences(decoder_input_test)
decoder_target_test = tar_tokenizer.texts_to_sequences(decoder_output_test)

# 잘 변환되었는지 확인
print('input')
print('input ',decoder_input_train[:5])
print('target')
print('decoder ',decoder_target_train[:5])
빈도수에 따른 전처리를 진행했습니다.
진행 중 또 우리가 모르는 결측치가 발생했을 수 있기 때문에 한 번 확인하고 만약 있다면 데이터에서 지워줍니다.
drop_train = [index for index, sentence in enumerate(decoder_input_train) if len(sentence) == 1]
drop_test = [index for index, sentence in enumerate(decoder_input_test) if len(sentence) == 1]

print('삭제할 훈련 데이터의 개수 :', len(drop_train))
print('삭제할 테스트 데이터의 개수 :', len(drop_test))

encoder_input_train = [sentence for index, sentence in enumerate(encoder_input_train) if index not in drop_train]
decoder_input_train = [sentence for index, sentence in enumerate(decoder_input_train) if index not in drop_train]
decoder_target_train = [sentence for index, sentence in enumerate(decoder_target_train) if index not in drop_train]

encoder_input_test = [sentence for index, sentence in enumerate(encoder_input_test) if index not in drop_test]
decoder_input_test = [sentence for index, sentence in enumerate(decoder_input_test) if index not in drop_test]
decoder_target_test = [sentence for index, sentence in enumerate(decoder_target_test) if index not in drop_test]

print('훈련 데이터의 개수 :', len(encoder_input_train))
print('훈련 레이블의 개수 :', len(decoder_input_train))
print('테스트 데이터의 개수 :', len(encoder_input_test))
print('테스트 레이블의 개수 :', len(decoder_input_test))
위에서 문장의 길이가 1인 행을 삭제해준다고 했는데 그 이유는 우리가 디코더의 데이터에는 시작 토큰, 마무리 토큰을 넣어줬기 때문에 만약 전처리 과정에 이 두 개의 토큰을 제외한 모든 토큰이 사라졌다면 길이가 1일 것입니다. 따라서 길이 1인 데이터는 결측치로 보고 삭제하겠다는 뜻입니다.
이제 서로 길이가 다를 테니 패딩을 진행해줍니다.
encoder_input_train = pad_sequences(encoder_input_train, maxlen=max_text_len, padding='post')
encoder_input_test = pad_sequences(encoder_input_test, maxlen=max_text_len, padding='post')
decoder_input_train = pad_sequences(decoder_input_train, maxlen=max_headline_len, padding='post')
decoder_target_train = pad_sequences(decoder_target_train, maxlen=max_headline_len, padding='post')
decoder_input_test = pad_sequences(decoder_input_test, maxlen=max_headline_len, padding='post')
decoder_target_test = pad_sequences(decoder_target_test, maxlen=max_headline_len, padding='post')
어텐션 메커니즘을 사용하여 모델 설계
먼저 LSTM을 이용하여 설계를 하겠습니다.
from tensorflow.keras.layers import Input, LSTM, Embedding, Dense, Concatenate, TimeDistributed
from tensorflow.keras.models import Model
from tensorflow.keras.callbacks import EarlyStopping, ModelCheckpoint

# 인코더 설계 시작
embedding_dim = 256
hidden_size = 128

# 인코더
encoder_inputs = Input(shape=(max_text_len,))

# 인코더의 임베딩 층
enc_emb = Embedding(src_vocab, embedding_dim)(encoder_inputs)

# 인코더의 LSTM 1
encoder_lstm1 = LSTM(hidden_size, return_sequences=True, return_state=True, dropout=0.5)
encoder_output1, state_h1, state_c1 = encoder_lstm1(enc_emb)

# 인코더의 LSTM 2
encoder_lstm2 = LSTM(hidden_size, return_sequences=True, return_state=True, dropout=0.5)
encoder_output2, state_h2, state_c2 = encoder_lstm2(encoder_output1)

# 인코더의 LSTM 3
encoder_lstm3 = LSTM(hidden_size, return_state=True, return_sequences=True, dropout=0.5)
encoder_outputs, state_h, state_c = encoder_lstm3(encoder_output2)


# 디코더 설계
decoder_inputs = Inpu(shape=(None, ))

# 디코더의 임베딩 층
dec_emb_layer = Embedding(tar_vocab, embedding_dim)
dec_emb = dec_emb_layer(decoder_inputs)

# 디코더의 LSTM
decoder_lstm = LSTM(hidden_size, return_sequences=True, return_state=True, dropout=0.5)
decoder_outputs, _, _ = decoder_lstm(dec_emb, initial_state=[state_h, state_c]

# 디코더의 출력층
decoder_softmax_layer = Dense(tar_vocab, activation='softmax')
decoder_softmax_outputs = decoder_softmax_layer(decoder_outputs)


# 모델 정의
model = Model([encoder_inputs, decoder_inputs], decoder_softmax_outputs)
model.summary()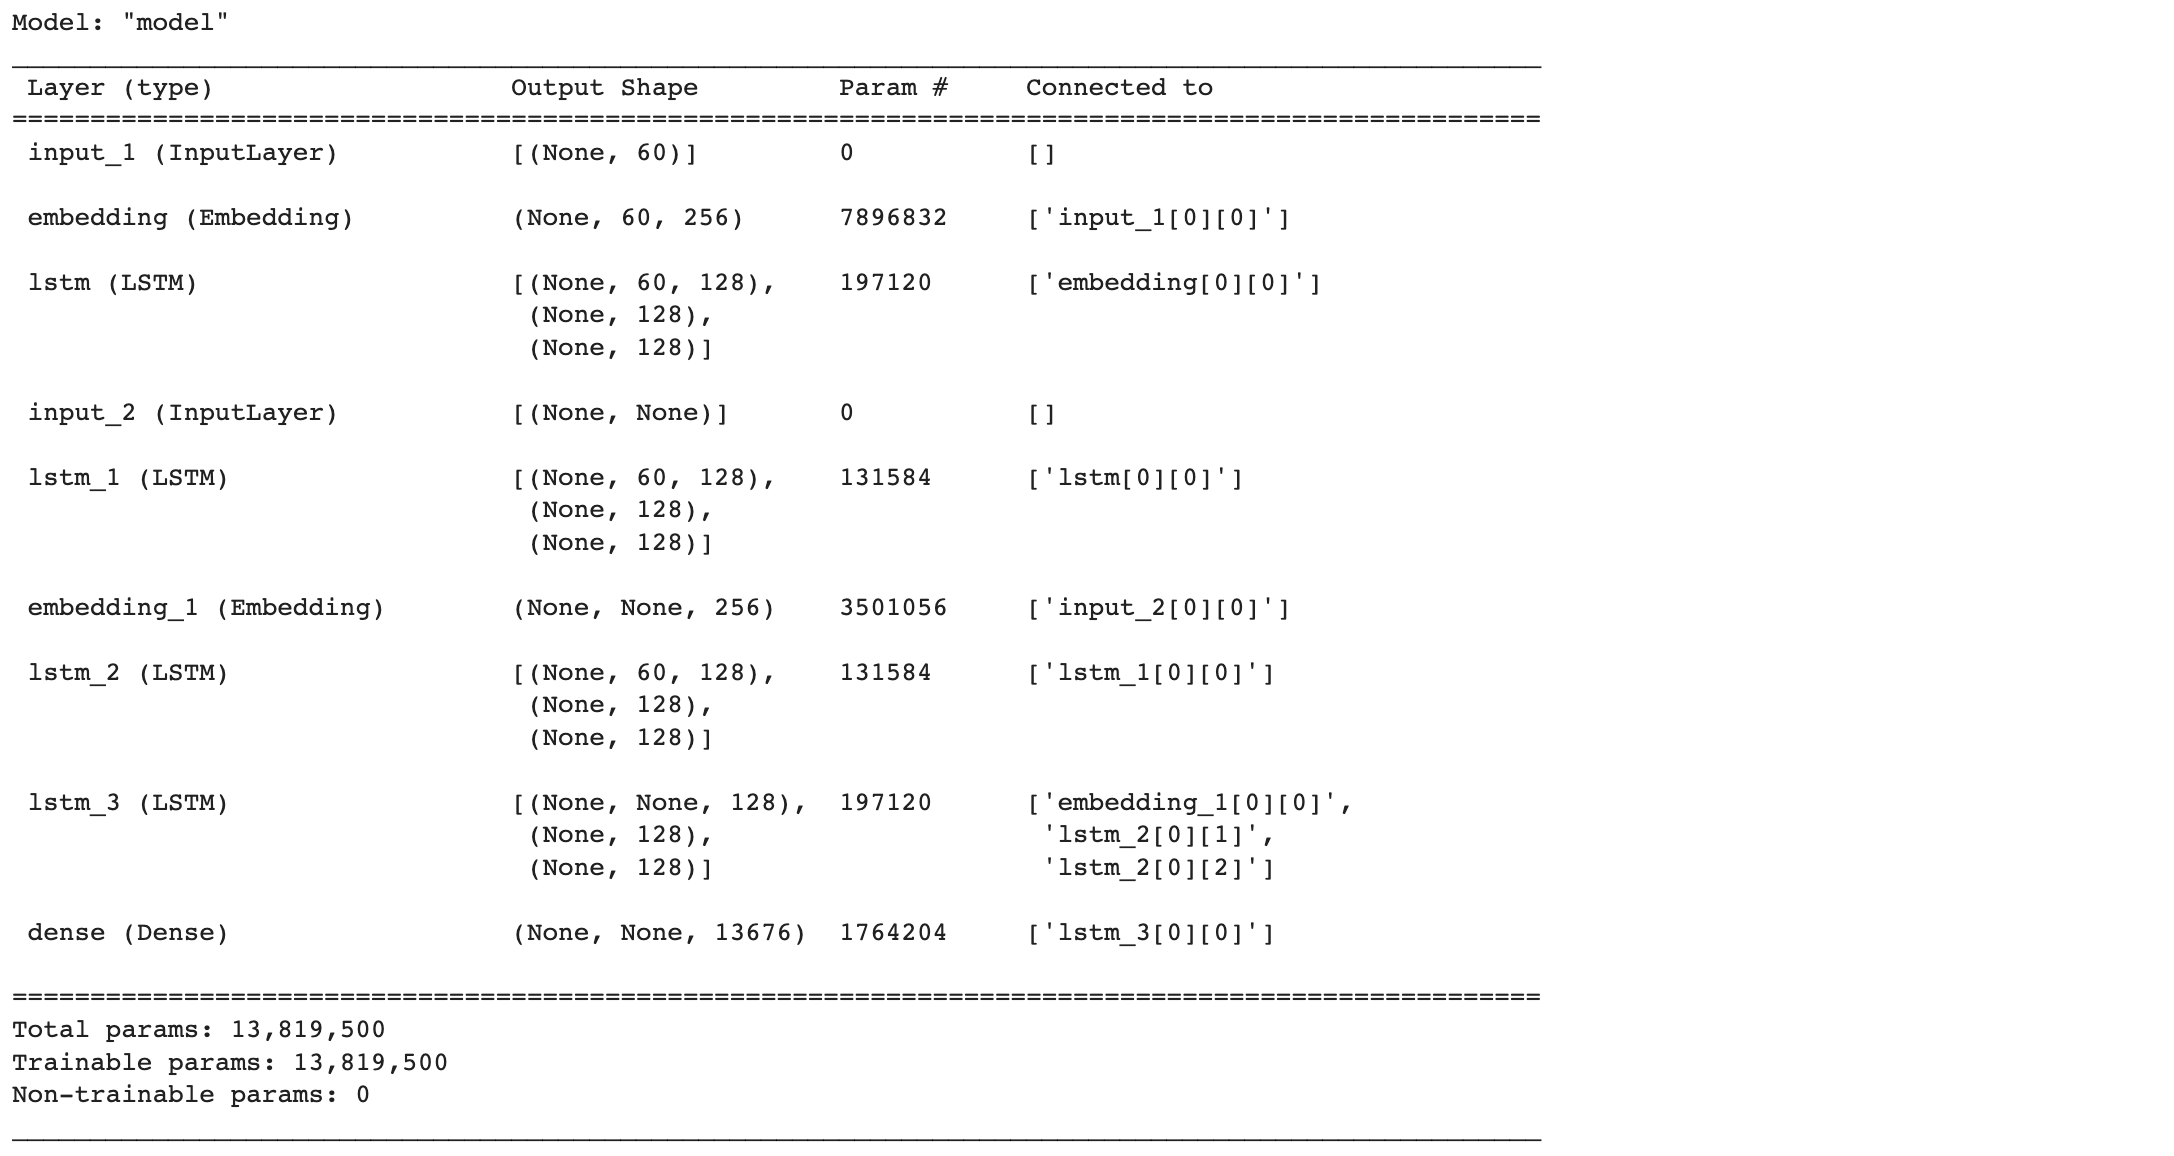
어텐션 레이어 추가
from tensorflow.keras.layers import AdditiveAttention

# 어텐션 층(어텐션 함수)
attn_layer = AdditiveAttention(name='attention_layer')

# 인코더와 디코더의 모든 time step의 hidden state를 어텐션 층에 전달하고 결과를 리턴
attn_out = attn_layer([decoder_outputs, encoder_outputs])

# 어텐션의 결과와 디코더의 hidden_state들을 연결
decoder_concat_input = Concatenate(axis=-1, name='concat_layer')([decoder_outputs, attn_out])

# 디코더의 출력층
decoder_softmax_layer = Dense(tar_vocab, activation='softmax')
decoder_softmax_outputs = decoder_softmax_layer(decoder_concat_input)

# 모델 정의
model = Model([encoder_inputs, decoder_inputs], decoder_softmax_outputs)
model.summary()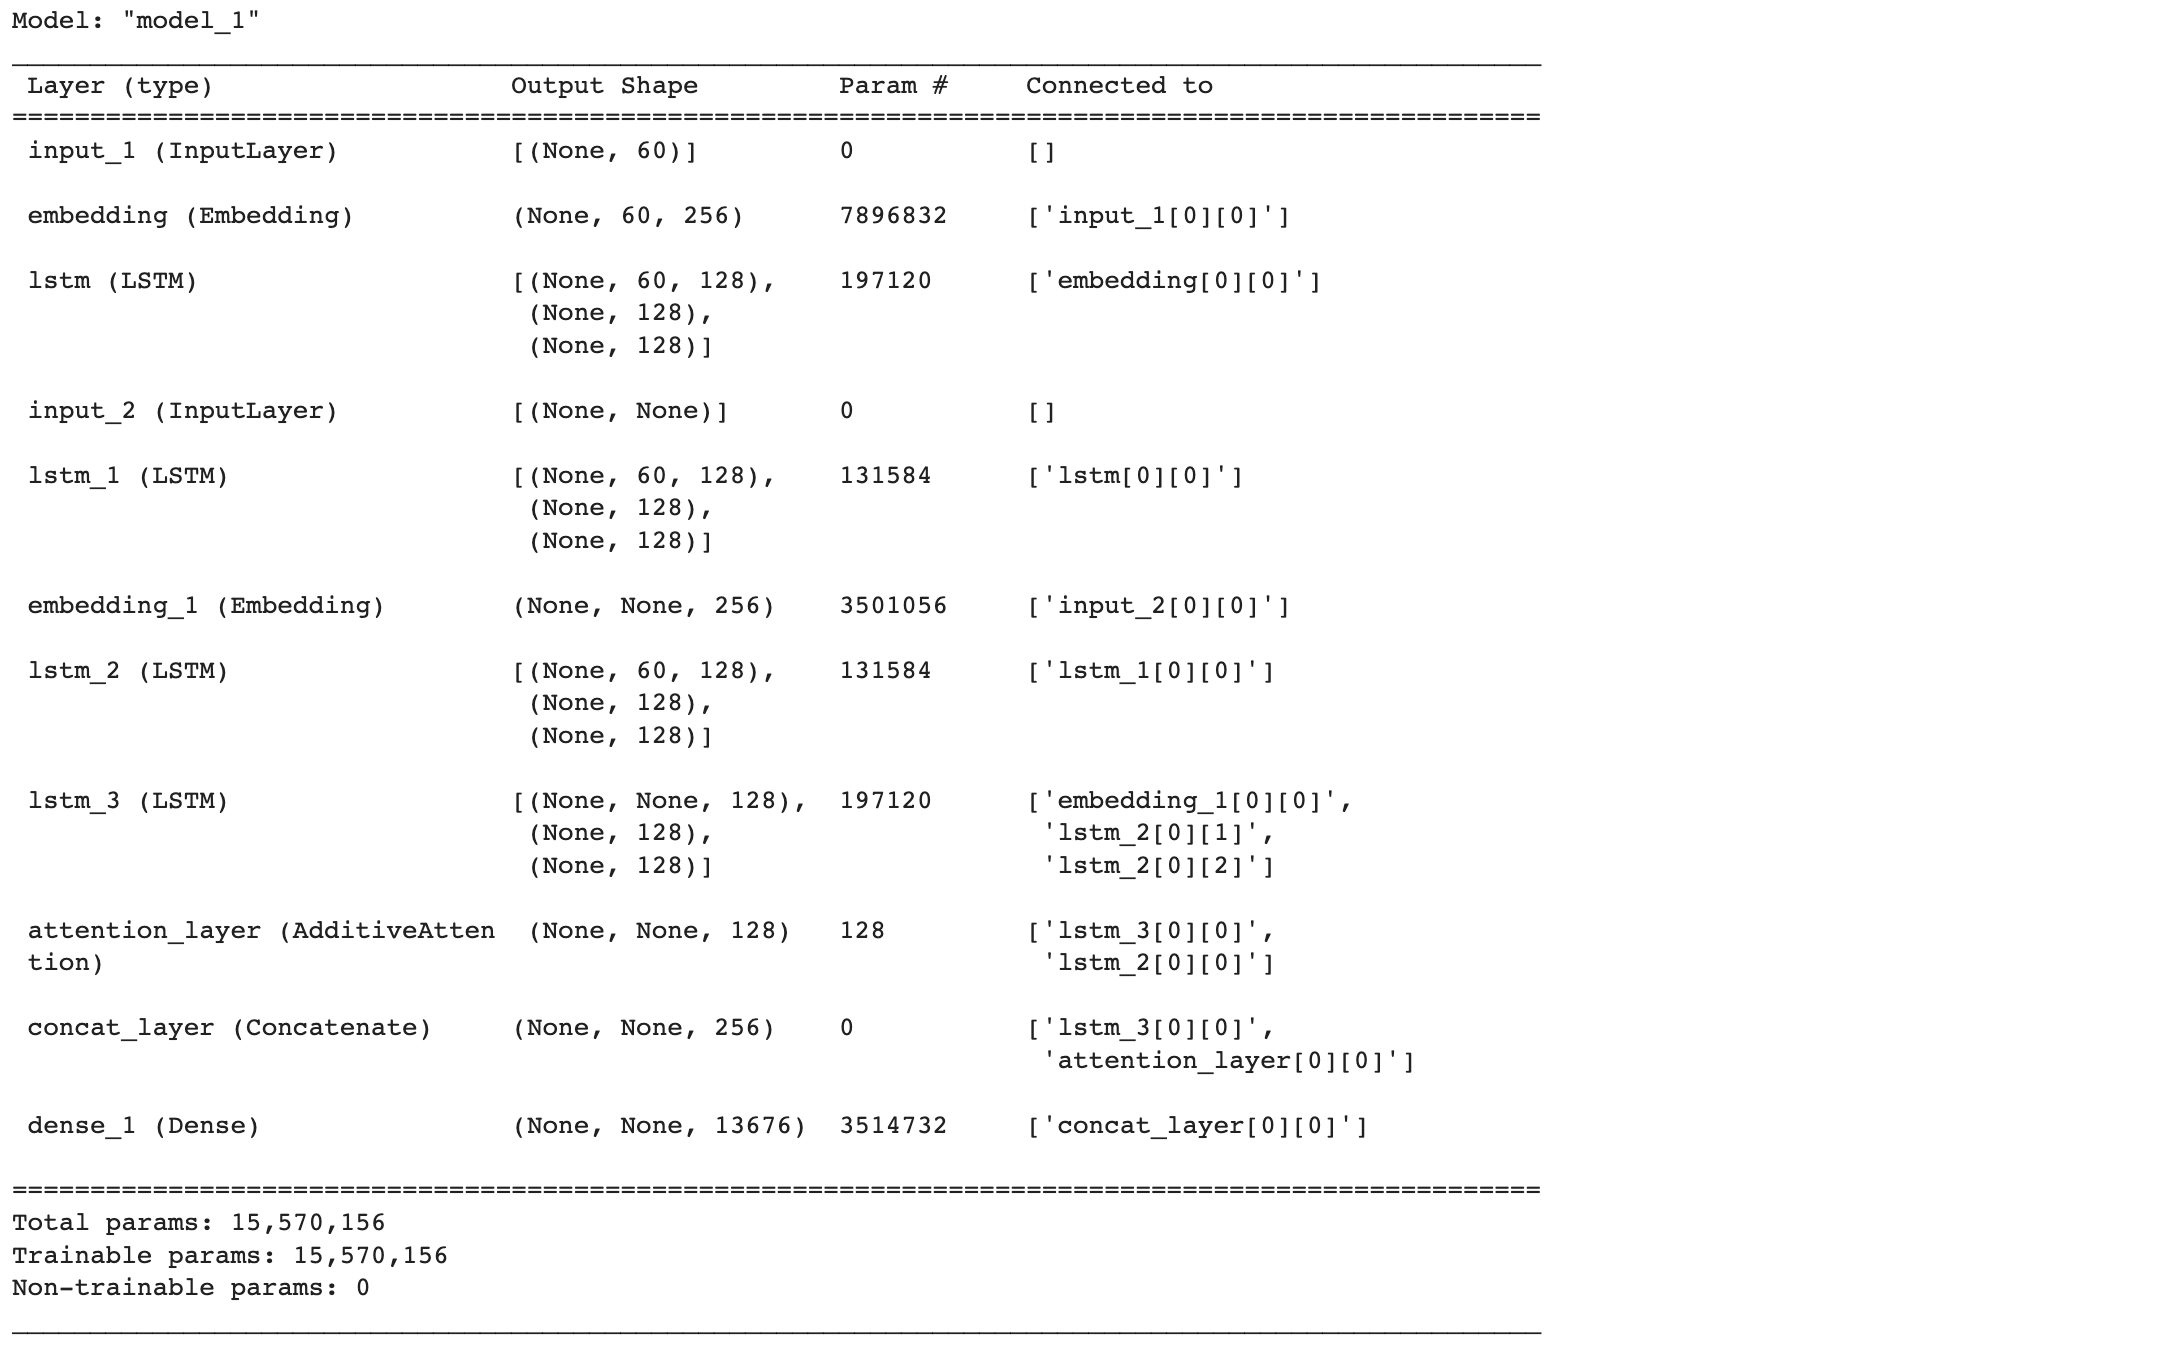
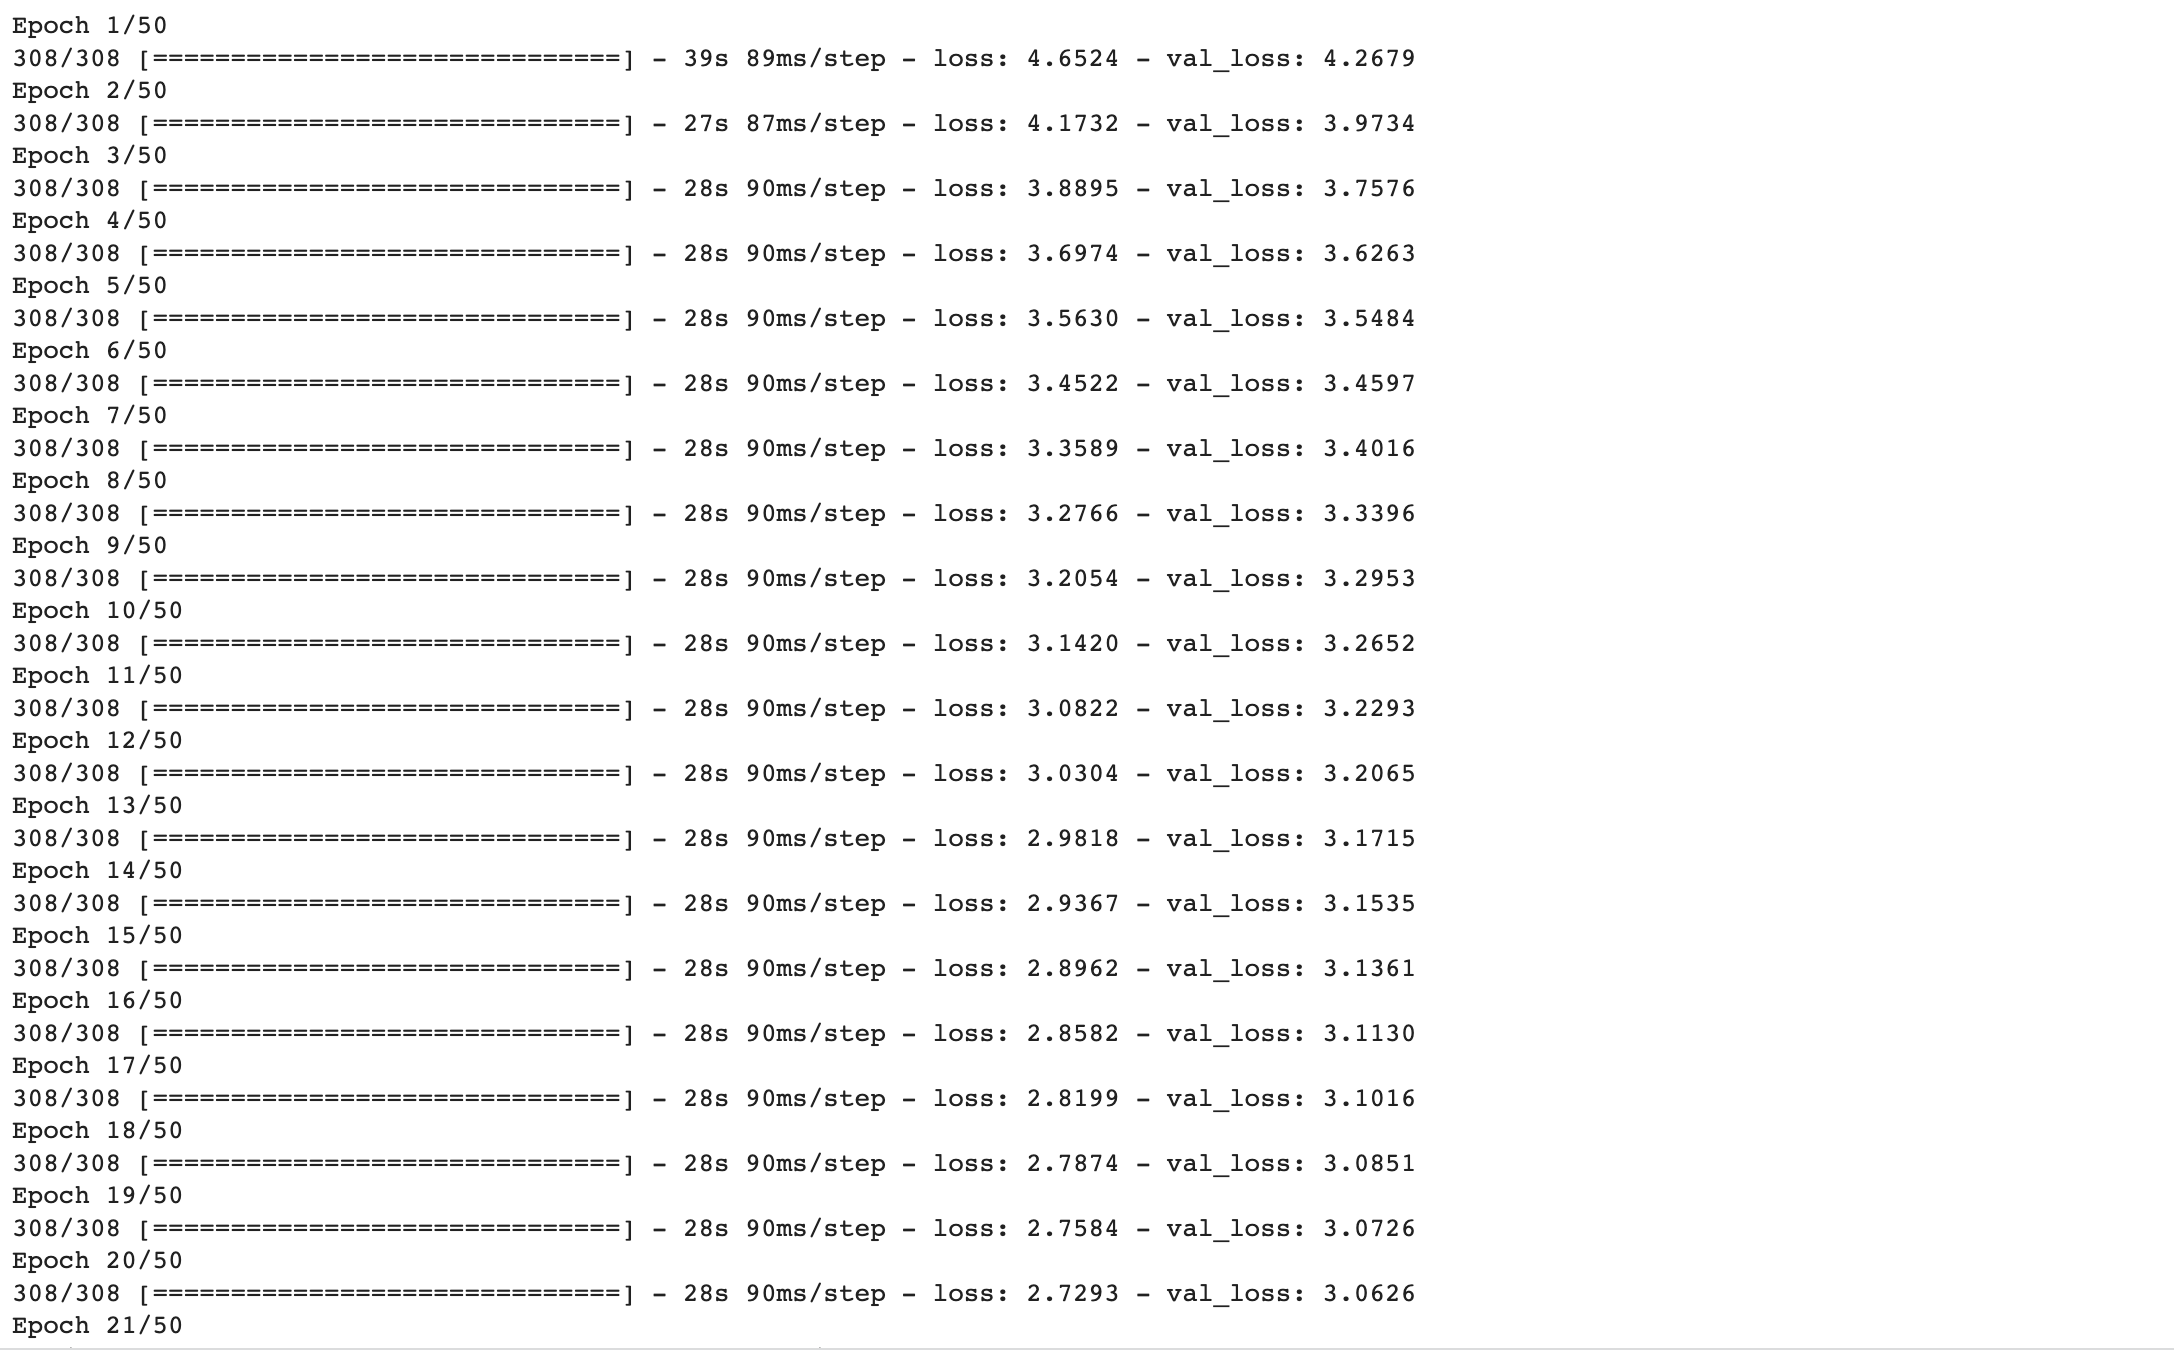
설계한 모델을 훈련시켜 보겠습니다.
model.compile(optimizer='rmsprop', loss='sparse_categorical_crossentropy')
es = EarlyStopping(monitor='val_loss', patience=2, verbose=1)
history = model.fit(x=[encoder_input_train, decoder_input_train], y=decoder_target_train,
                    validation_data=([encoder_input_test, decoder_input_test], decoder_target_test),
                    batch_size=256, callbacks=[es], epochs=50)

훈련 과정을 시각화하여 확인해보겠습니다.
plt.plot(history.history['loss'], label='train')
plt.plot(history.history['val_loss'], label='test')
plt.legend()
plt.show()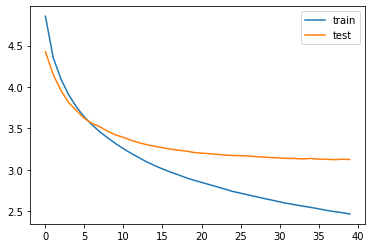
이제 훈련을 마쳤으니 인퍼런스 모델을 구현해보겠습니다.
src_index_to_word = src_tokenizer.index_word # 원문 단어 집합에서 정수 -> 단어
tar_word_to_index = tar_tokenizer.word_index # 요약 단어 집합에서 단어 -> 정수
tar_index_to_word = tar_tokenizer.index_word # 요약 단어 집합에서 정수 -> 단어

# 인코더
encoder_model = Model(inputs = encoder_inputs, outputs = [encoder_outputs, state_h, state_c])

# 이전 시점의 상태들을 저장하는 텐서
decoder_state_input_h = Input(shape=(hidden_size, ))
decoder_state_input_c = Input(shape=(hidden_size, ))

dec_emb2 = dec_emb_layer(decoder_inputs)

# 문장의 다음 단어를 예측하기 위해서 초기 상태를 이전 시점의 상태로 사용
# 이는 뒤의 함수 decode_sequence()에 구현
# 훈련 과정에서와 달리 LSTM의 리턴하는 은틱 상태와 셀 상태인 state_h와 state_c를 버리지 않음
decoder_outputs2, state_h2, state_c2 = decoder_lstm(dec_emb2, initial_state=[decoder_state_input_h, decoder_state_input_c])

# 어텐션 함수
decoder_hidden_state_input = Input(shape=(max_text_len, hidden_size))
attn_out_inf = attn_layer([decoder_outputs2, decoder_hidden_state_input])
decoder_inf_concat = Concatenate(axis=-1, name='concat')([decoder_outputs2, attn_out_inf])

# 디코더의 출력층
decoder_outputs2 = decoder_softmax_layer(decoder_inf_concat)

# 최종 디코더 모델
decoder_model = Model(
     [decoder_inputs] + [decoder_hidden_state_input, decoder_state_input_h, decoder_input_state_c],
     [decoder_outputs2] + [state_h2, state_c2])
def decode_sequence(input_seq):
# 입력으로부터 인코더의 상태를 얻음
e_out, e_h, e_c = encoder_model.predict(input_seq)
# <SOS>에 해당하는 토큰 생성
target_seq = np.zeros((1,1))
target_seq[0,0] = tar_word_to_index['starttoken']
stop_condition = False
decoded_sentence = ''
while not stop_condition:
output_tokens, h, c = decoder_model.predict([target_seq] + [e_out, e_h, e_c])
sampled_token_index = np.argmax(output_tokens[0, -1, :])
sampled_token = tar_index_to_word[sampled_token_index]
if (sampled_token != 'endtoken'):
decoded_sentence += ' '+sampled_token
# <EOS>에 도달하거나 최대 길이를 넘으면 중단.
if (sampled_token == 'endtoken' or len(decoded_sentence.split()) >= (max_headline_len - 1)):
stop_condition = True
# 길이가 1인 타겟 시퀀스를 업데이트
target_seq = np.zeros((1,1))
target_seq[0,0] = sampled_token_index
# 상태를 업데이트 합니다.
e_h, e_c = h, c
return decoded_sentence모델 테스트하기
# 원문의 정수 시퀀스를 텍스트 시퀀스로 변환
def seq2text(input_seq):
    temp=''
    for i in input_seq:
        if (i!=0):
            temp = temp + src_index_to_word[i]+' '
    return temp

# 요약문의 정수 시퀀스를 텍스트 시퀀스로 변환
def seq2summary(input_seq):
    temp=''
    for i in input_seq:
        if ((i!=0 and i!=tar_word_to_index['starttoken']) and i!=tar_word_to_index['endtoken']):
            temp = temp + tar_index_to_word[i] + ' '
    return temp
실제 결과와 요약문 비교하기
for i in range(50, 60):
    print("원문 :", seq2text(encoder_input_test[i]))
    print("실제 요약 :", seq2summary(decoder_input_test[i]))
    print("예측 요약 :", decode_sequence(encoder_input_test[i].reshape(1, max_text_len)))
print("\n")| 원문 | 실제 요약 | 예측 요약 |
| government vaults unclaimed deposits amounting 19 567 crore june 2018 33 higher previous year unclaimed deposits stood 14 crore deposits tansferred rbi education awareness fund takes bank accounts deposits operated claimed 10 years | 19 crore left unclaimed in bank as of june 2018 | deposits of money in deposits of crore in 2016 17 |
| bahrain court tuesday revoked ctizenship 115 people awarded life sntences 53 others mass terorism trial prosecutors said accused detonated bombs rceived weapons training atempted kill police officers bahrain claimed iran helped accused set militant group called zulfiqar | bahrain revokes ctizenship of 115 people on teror charges | isis claims responsbility for killing us in iraq |
| comedian turned actor andy dick fired two movies accused sexual misconduct harassment sets andy accused groping people non consensual kissing licking said anybody might kissed somebody cheek say good bye thing said funny | comedian andy fired from films post sexual misconduct claims | was sexually abused by comedian kapil sharma |
| eight time grand slam champion ustralia ken writes good luck letter adressed wiss tennis star roger fderer ustralian open fderer tournament five times said cherishes letters write simple half page good luck hope family well extent said | tennis legend writes letter to fderer at every aus open | fderer is not fderer roger fderer |
| denying rumours making biopic late actress sridevi filmmaker ram gopal verma said blieve foolish atempt also cannot actress remotely worthy enough play late actress worked ram gopal varma 1991 telugu film | no actress worthy enough to play sridevi in biopic rgv | am not playing an actor on sridevi demise |
요약 결과가 생각보다 좋지 않습니다....
전처리 과정에서 최대 길이를 설정할 때 그냥 제일 긴 문장으로 한 게 문제였을지도 모르겠네요... ㅎㅎ
그래도 요약 봇을 만들면서 사용법이나 구현된 코드를 가지고 따라 하는 수준이지만 Attention에 대해 알아보고 원리에 대해 공부할 수 있는 기회를 가졌다는 것에 의의를 두겠습니다😅
Attention mechanism에 대해서는 따로 논문을 읽고 정리해야 될 것 같습니다. 나중에 배우게 될 Transformer를 위해....
1) 어텐션 메커니즘 (Attention Mechanism)
앞서 배운 seq2seq 모델은 **인코더**에서 입력 시퀀스를 컨텍스트 벡터라는 하나의 고정된 크기의 벡터 표현으로 압축하고, **디코더**는 이 컨텍스트 벡터를 통해서 ...
wikidocs.net
https://arxiv.org/pdf/1409.0473.pdf
'AI > Toy Project' 카테고리의 다른 글
| [NLP] Attention을 이용하여 한-영 번역기 만들기 (0) | 2022.10.17 |
|---|---|
| seq2seq 모델을 이용한 번역기 만들기 (1) | 2022.09.22 |
| 네이버 영화리뷰 감성분석하기 (1) | 2022.09.21 |


